Comovis: Enhancing Indoor Air Quality Monitoring with the Seeed Studio XIAO ESP32C3 and Home Assistant
Delve into the importance of recognizing indoor air pollution and its impact on our health. Meet Comovis, a cutting-edge indoor air monitoring device created by Nayel Khouatra. Comovis not only detects harmful PM2.5 particles but also tracks temperature and humidity. With its intuitive light indicator and seamless Home Assistant platform integration, Comovis empowers users to easily assess their air quality for a healthier living environment.
Seeed Hardware: Seeed Studio XIAO ESP32C3, Grove – Air Quality Sensor v1.3
Software: Arduino, Home Assistant, ESPHome
Industry: Smart Home, Smart Building
The Background
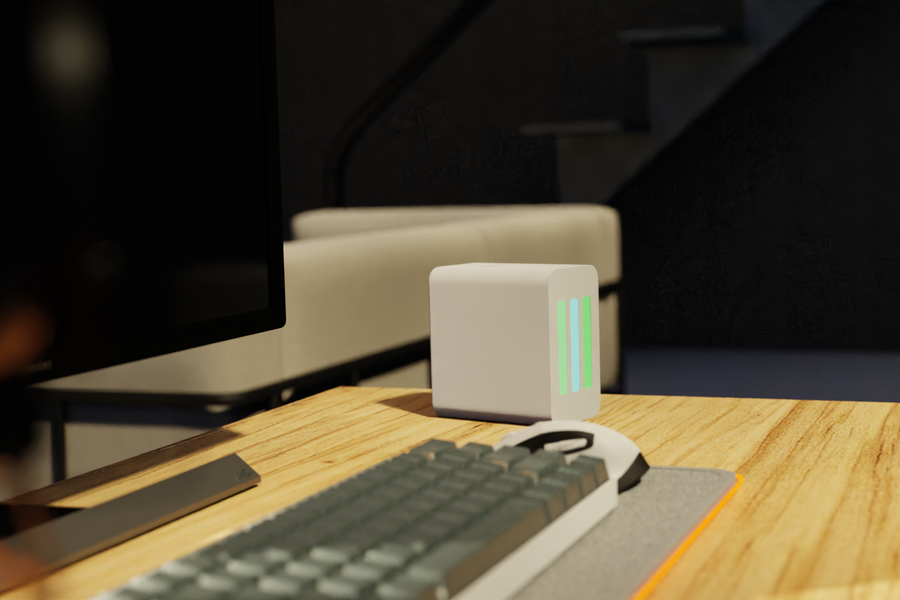
In an age where environmental concerns and health awareness are on the rise, Comovis emerges as a pioneering solution for safeguarding homes. Comovis is a system developed by Nayel Khouatra that helps keep homes safe and healthy by providing real-time information about indoor air quality. It uses a sensor to monitor PM2.5 particles, temperature, humidity, and more. This information is displayed through simple lights, making it easy for users to understand if the air is safe or not. Comovis also connects to the Home Assistant platform, allowing users to check air quality on their phones or computers, bringing peace of mind to home environments.
The Challenge
Comovis faces challenges in adapting to different indoor air quality conditions and ensuring sensor accuracy. It also needs to make sure its hardware is durable. Addressing privacy concerns and integrating smoothly with smart home systems is another hurdle. Despite these challenges, Comovis is committed to making homes healthier and safer for its users.
The Solution
Step 1: Set up
The first step outlines the setup and configuration of Home Assistant, an open-source home automation platform, and ESPHome, a system for controlling ESP boards using YAML configuration files, in order to create a home automation and monitoring system. The steps involve:
- Installation of Virtual Machine: First, Nayel set up a virtual machine (VM) to run Home Assistant. This involves downloading and installing VirtualBox and creating a folder named “Home assistant” to store the necessary files.
- Configuration for the Virtual Machine: Nayel configured the VM by giving it a name, specifying the OS type (Linux), allocating memory (2000 MB), and using an existing disk. He also configured the network settings to use an Ethernet connection.
- Configuration of Home Assistant and ESPHome: Once the VM is set up, he accessed Home Assistant via an IP address provided by the VM and created a user account and then proceed to install the ESPHome add-on within Home Assistant. After installation, he configured ESPHome to make the ESP boards visible and ready for use.
This setup allows to create a home automation system with Home Assistant and control ESP boards using ESPHome, enhancing the ability to monitor and automate various aspects of home.
Step 2: Flowchart,Schematic and Circuit
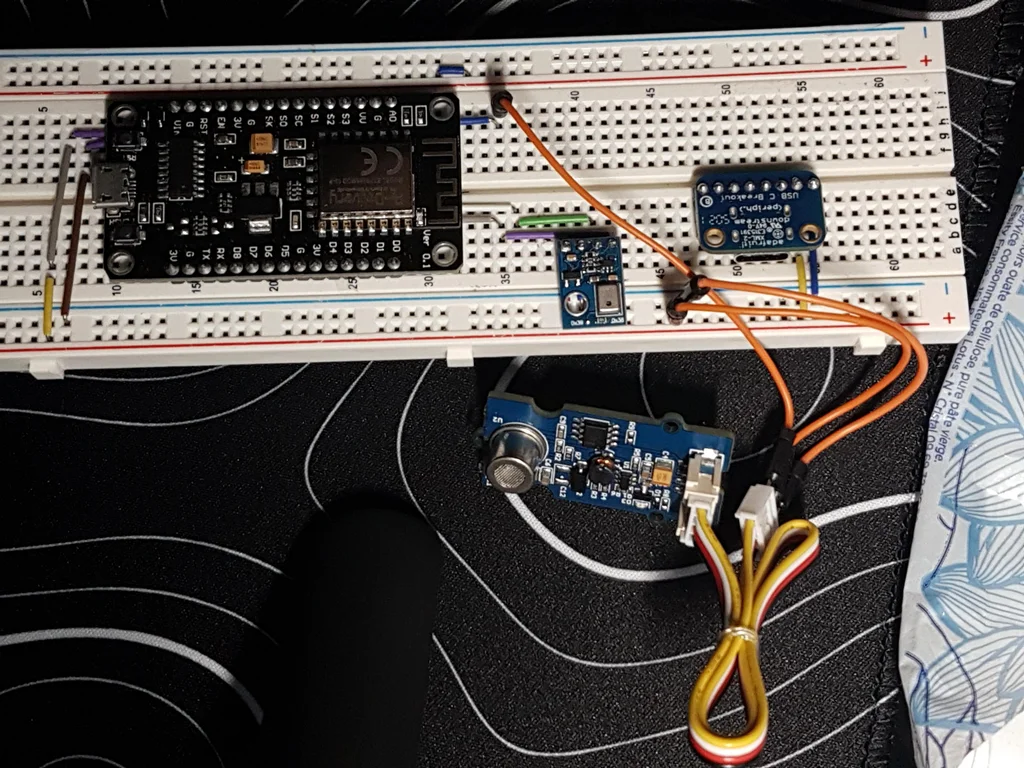
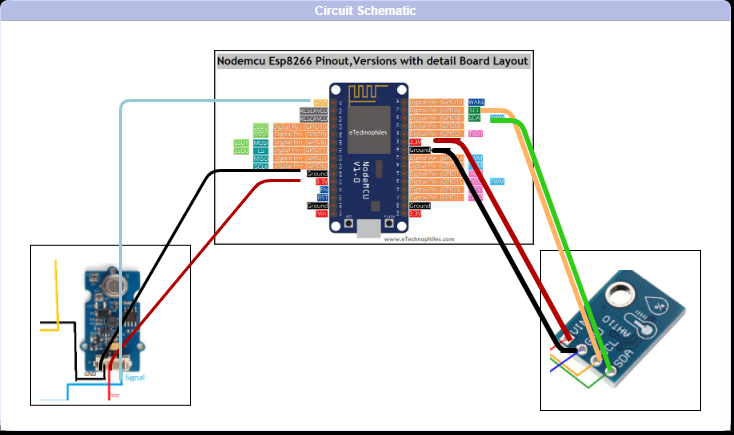
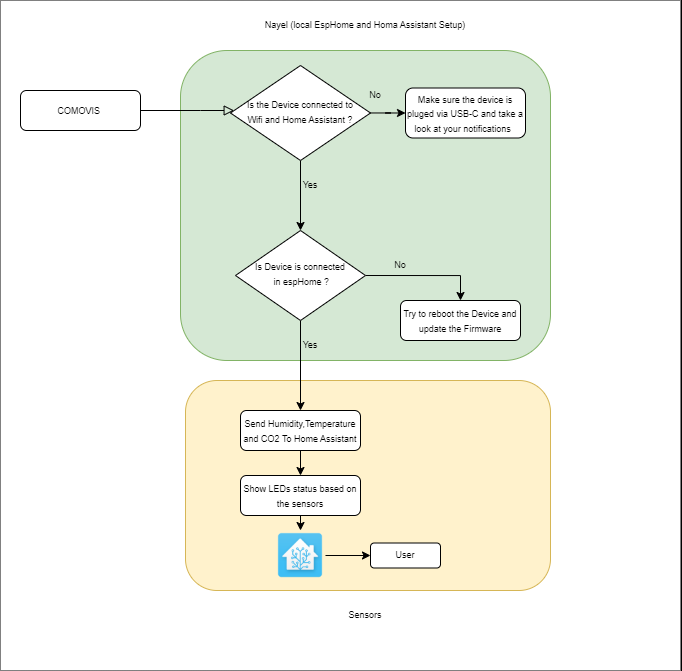
This process involves setting up the Comovis system, which is connected to ESPHome and HomeAssistant. It uses an ESP32 or ESP8266 microcontroller to collect data from two sensors: the AHT10 for temperature and humidity and the Air_Quality_Sensor_V1.3 for CO2 and PM2.5 particle measurements. Based on this data, the status of three LED strips changes colors, and the data is sent to Home Assistant.
For the hardware setup, Nayel used a Seeed Studio XIAO ESP32C3, an AHT10 sensor, an Air_Quality_Sensor_V1.3, and a USB-C breakout board for power. The AHT10 is connected to the SDA and SCL pins of the XIAO ESP32-C3 (GPIO 6 and GPIO 7), with +5V and GND connected to the USB-C breakout board. The Air_Quality_Sensor_V1.3 connects its SIG pin to the ESP’s Analog pin (GPIO 2) and also uses the USB-C breakout board for power.
Once this setup is complete and the device is connected to Wi-Fi and HomeAssistant, he received notifications about the appearance of the new device and view the collected data on his Home Assistant dashboard.
Step 3: 3D printing and assembling
In the process of creating Comovis, 3D printing was used to manufacture its components. The filament of choice was ColorFabb AllPHA, known for its eco-friendliness as it’s made from recycled and biodegradable materials, though it comes at a relatively high cost. The entire Comovis device, including its various components, was 3D printed using this filament.
This assembly process involves three key steps:
- RGB Lights: Cut and attach LED strips to the diffuser, solder wires, and place the diffuser in the CO2 box.
- ESP32C3: Use a designed socket to attach the XIAO ESP32C3, securing it in the Comovis base with glue.
- Sensors: A specially designed socket accommodates and secures the AHT10 and Air_Quality_Sensor_V1.3 sensors in the Comovis back.
Finally, manage cables neatly and close the Comovis device.
Step 4: Program&check result
In the ESPHome programming process, Nayel first set up his ESP8266 (or ESP32) and then modify the .YAML file to add the sensors and LEDs. It’s essential to include the library.h for the sensor, which can be downloaded from the GitHub repository provided. While Arduino is an option for programming, ESPHome offers a more straightforward approach.
Once the device and server are ready, Nayel could view various information on his dashboard, including temperature, humidity, and air quality. While the dashboard design can be customized, the current layout is deemed effective for displaying information.
The Conclusion
Looking ahead, there’s room for improvement in making Comovis more practical and user-friendly. Potential enhancements include adding features like pressure sensors or an all-in-one sensor for temperature, humidity, and air quality, simplifying assembly, and possibly developing an app for user notifications.
More Information
Learn More Project Details on Instructables: Comovis (Co2 ,Temperature and Humidity Sensor for EspHome)
Please feel free to reach out to maker.team@seeed.cc for any inquiries or if you’d like to engage in further project discussions. Your questions and interest are welcomed.