Adding Ethernet to Raspberry Pi Pico – It’s easier than you think!

Released in late January of 2021, Raspberry Pi Pico is a flexible microcontroller board based on the Raspberry Pi RP2040 microcontroller chip. It has many unique and compelling features, but networking ain’t one of them. However, this was only a temporary issue as Ethernet support was released over Pi Day weekend.
In this article, we will be going through how to set up your Raspberry Pi Pico to connect it to ethernet. You will make your Pico more versatile for projects by connecting it to the internet at a very affordable cost!
How does it work?
Before we get into the actual setting up, let’s talk about how does it work. The Ethernet support was put together by Sandeep Mistry, a well-known software engineer. Sandeep Mistry was known for authoring noble and bleno Node.js module for implementing Bluetooth Low Energy peripherals, and also the Arduino LoRa library.
There is support for both USB Ethernet and Ethernet PHY. It’s based on the lwIP stack and takes advantage of the RP2040’s PIO, DMA, and dual-core capabilities to build an Ethernet MAC stack in software. A shortfall is only RMII-based Ethernet PHY devices, such as the Microchip LAN8720, are currently supported by the project.
Fortunately, for less than $2, you can get breakout boards for the LAN8720. This means that you can connect your $4 microcontroller to the internet via an ethernet breakout board for less than $2. Let’s get started!
What you’ll need:
- Raspberry Pi Pico
- RMII-based Ethernet PHY device (we will be using LAN8720 for this tutorial)
- Breadboard
- 11 Jumper Wires
Steps:
Building the Libraries
Before you get started, you’ll need to install the toolchain. The toolchain will be used to build code for the RP2040. You can learn how to do it here.
1. Set up C/C++ SDK on your Pi Pico by following this guide.
2. Ensure your pico-sdk checkout and its submodules are up to date.
3. Download the pico-rmii-ethernet project from here and the lwIP stack from here.
4. Ensure PICO_SDK_PATH is set.
$ export PICO_SDK_PATH = /home/pi/pico/pico-sdk
5. Build both the library and the example application.
$ mkdir build
$ cd build
$ cmake ..
$ make
After this, you should have a UF2 File in build/examples/httpd called pico_rmii_ethernet_httpd.uf2.
6. Connect your Raspberry Pi Pico to your computer or Raspberry Pi and drag and drop the UF2 file into it.
Wiring the LAN8720 to your Raspberry Pi Pico
The LAN8720 is unfortunately not breadboard-friendly. You will need 11 jumper wires to hook it all up to the Raspberry Pi Pico.
1. Connect your Raspberry Pi Pico to the breadboard
2. Wire up the LAN8720 breakout board to your Raspberry Pi Pico – Follow the mapping below.
| LAN8720 Breakout | Pico | RP2040 |
| RX0 | Pin 9 | GP6 |
| RX1 (RX0 + 1 ) | Pin 10 | GP7 |
| CRS (RX0 + 2) | Pin 11 | GP8 |
| TX0 | Pin 14 | GP10 |
| TX1 (TX0 + 1) | Pin 15 | GP11 |
| TX-EN (TX0 + 2) | Pin 16 | GP12 |
| MDIO | Pin 19 | GP14 |
| MDC | Pin 20 | GP15 |
| nINT / RETCLK | Pin 26 | GP20 |
| VCC | 3V3 (OUT) | — |
| GND | Pin 38 | GND |
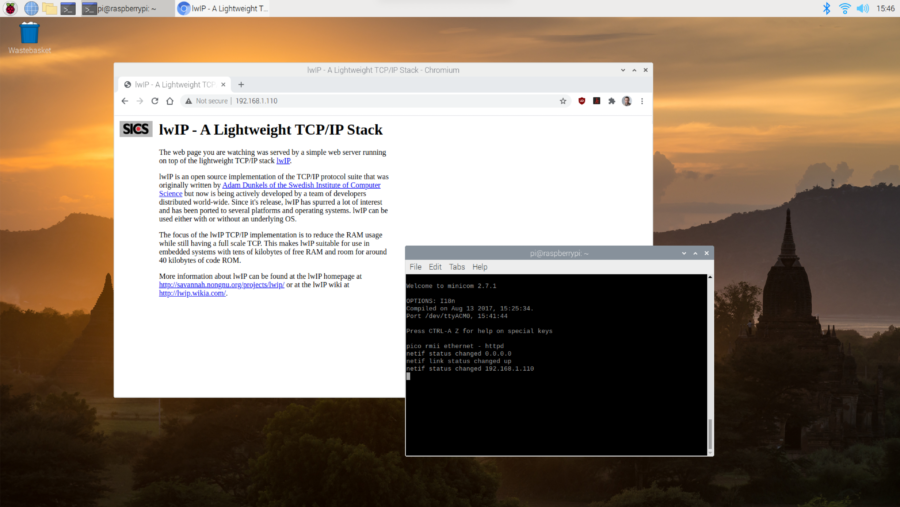
3. Connect an Ethernet cable and also the Raspberry Pi Pico into your Raspberry Pi or Computer – You will see some debuffing information via USB Serial
4. Start minicom$ minicom -D /dev/ttyACM0
As long as you’re router is handing IP addresses to your Pico, you should see something like this in minicom:
pico rmii ethernet - httpd
netif status changed 0.0.0.0
netif link status changed up
netif status changed 192.168.1.110
5. Type the IP address of your Pico to your browser and check if you see the default lwIP index page:

Source: RaspberryPi
If you see this, congratulations, you’ve successful connected your Raspberry Pi Pico to a web server!
How to change the loaded web page?
Don’t worry, it is a simple tweak!
1. In the lwIP git submodule, find the “file system” with the default lwIP pages inside the HTTP application folder.
$ cd pico-rmii-ethernet/lib/lwip/src/apps/http/fs
$ ls
404.html   img/        index.html
$
2. Modify the index.html file with your preferred editor.
3. Move the file system directory into place, then repackage it using the makefsdata script
$ cd ..
$ mv fs makefsdata
$ cd makefsdata
$ perl makefsdata
4. You’ve then created a fsdata.c file in the directory. You will need to move the fsdata.c file to the parent directory and rebuild the UF2 file.
$ mv fsdata.c ..
$ cd ../../../../../..
$ rm -rf build
$ mkdir build
$ cd build
$ cmake ..
$ make
5. If everything goes according to plan, you will have a new UF2 file in build/examples/httpd called pico_rmii_ethernet_httpd.uf2. Load this UF2 file onto your Pico like before.
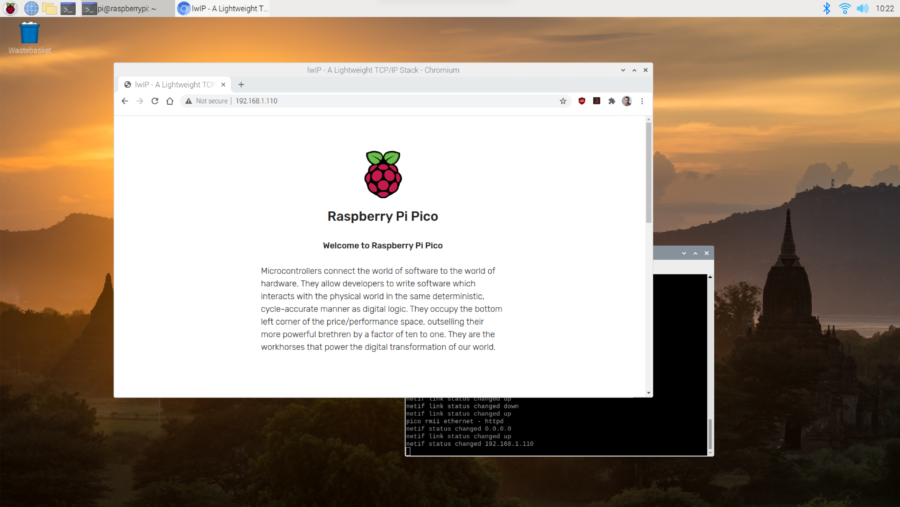
6. Restart the Pico and wait for a bit for the Pico to grab the IP address again. Type the IP address into the browser and you should see an updated web page:

Source: RaspberryPi
Before you restore your UF2, bear in mind that you’ll need to rebuild the fsdata.c file.
Current Limitations
As it is a fairly new implementation, there are a couple of limitations.
- The RP2040 chip will be underclocked to just 50MHz using the RMII modules’ reference clock
- Neither the Netcon API nor Socket API is enabled as the lwIP stack is compiled with NO_SYS
- Link speed will be set to 10 Mbps as there is an issue with TX at 100 Mbps.
Although this method of adding ethernet to the Raspberry Pi Pico works, there are still limitations. Fret not as this will all change with the Wio RP2040! The Wio RP2040 Family is centred around the Wio RP2040 Module, which includes built-in WiFi capabilities to provide steady and reliable wireless communication. The module works with all RP2040 development tools, including MicroPython and the Thonny Python code editor for the Raspberry Pi Pico. Find out more details at “Introducing Seeed’s Wio RP2040 Family – Mini Dev Board & Module!“. You can also check out the Wio RP2040 module at Seeed’s online store!
Summary
To wrap up, that is how you add an Ethernet connection to your Raspberry Pi Pico! The possibilities are endless with this added feature.
The lwIP is a TCP/IP stack so anything you can do over TCP you can now do on your Pico! We hope you find this guide helpful and here are some recommended articles to check out:
- Raspberry Pi Pico, the first microcontroller released by Raspberry Pi Foundation, based on the new RP2040 MCU.
- Raspberry Pi Pico: 10 Project Ideas!
- Programmable I/O with Raspberry Pi Pico