Managing Arduino Memory: Flash, SRAM, EEPROM!
Most of us have a general idea that the memory on our Arduino microcontrollers is an essential part of what allows them to store and run code. For the most part, that understanding is sufficient, but only if we’re working with simple programs! On the other hand, when trying to build a more advanced application like TinyML, a deeper understanding of Arduino memory can go a long way to help make the most of our beloved microcontrollers. Fortunately, this article is going to give you just that!
We will be covering the following content and more!
- Why should you know about Arduino memory?
- What is Memory in Arduino?
- How to Measure Arduino Memory Usage
- How to Optimise Memory Usage on Arduino
- Arduinos for Memory Intensive Projects

Why Should You Know About Arduino Memory?
In broad and simple terms, the purpose of memory blocks in Arduino microcontrollers is to store run-time data or information temporarily or permanently. For example, both the code that you upload to your Arduino and the variables declared in that code are stored in memory. In fact, memory is an essential component of any type of computer!
Microcontrollers like Arduino are built small and affordable to serve specific purposes and thus have relatively limited computing resources. Compared to modern computers which have Gigabytes (109) of memory as norm, microcontrollers function with memory sizes of Kilobytes (103) to a few Megabytes (106). Hence, it’s important to use the memory resources on our Arduino with careful consideration.

When memory is not managed well, your Arduino might fail in a variety of ways. Sometimes, this can be as obvious as the code not uploading to your board like shown above. In other cases, everything might appear to run fine for awhile, only for the microcontroller to stop responding later on – that’s much more tricky!
In any case, unless you’re working with a faulty board, it’s almost certain that any code that compiles but doesn’t work as it should is suffering from a memory problem. When that happens, it’s important to understand what goes on behind the scenes so that we can diagnose and fix the problem!
What is Memory in Arduino?
There are three types of Arduino memory that you should be aware of:
- Flash or Program Memory (PROGMEM)
- SRAM – Static Random Access Memory
- EEPROM – Electronically Erasable Programmable Read-Only Memory
Flash Memory
Flash memory is a type of memory that is used for storage, similar to what we see in USB thumb drives and SD cards. It is non-volatile, meaning that it will retain stored information even if no power is supplied.
In an Arduino, Flash used to store the program code and any additional data. Since data held in flash memory can’t be modified by executing code, they are first copied into the SRAM before the code is run.
SRAM
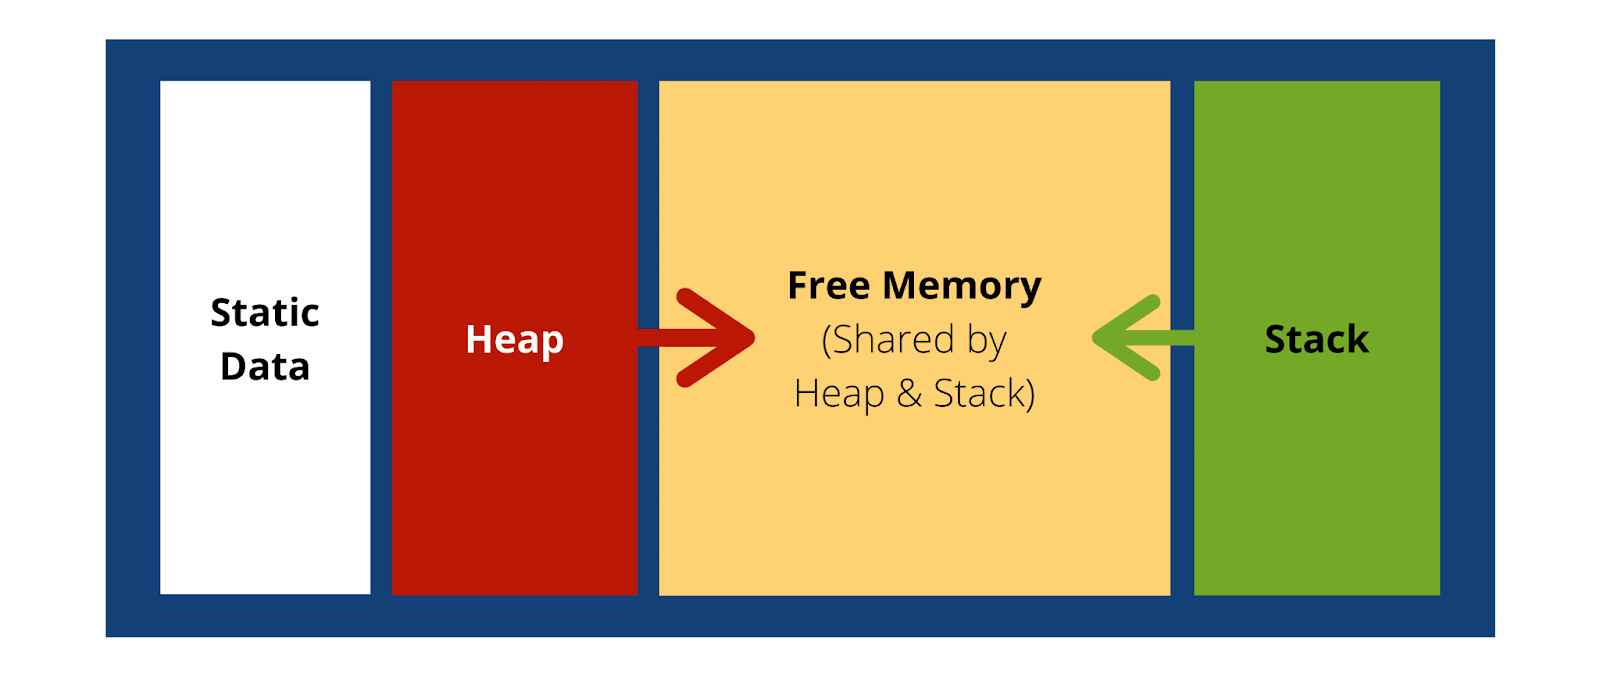
SRAM stands for Static Random Access Memory, and is arguably the most important component of diagnosing memory issues in Arduino. You can imagine it as a memory block that is shared amongst three main components: Static Data, Heap & Stack.

- Static Data – This section of the SRAM stores data that doesn’t change in the programme, such as global and static variables.
- Heap – The heap exists next to static data an is used for dynamically allocated data items, such as variables created by executing code.
- Stack – The stack is used to keep track of function parameters, including local variables, interrupts, and function calls. Each function call will increase the size of the stack, while returning from a function will return that memory to the free memory pool.
You might have noticed that the stack and heap are located on opposite ends of the free memory. As either of them grow, they consume more and more of the free memory, effectively “moving towards” each other. Most memory problems are the result of the stack and heap “colliding”, which can cause a corruption of the data held in memory. As mentioned, some corruptions may cause an immediate crash, or the code may still continue to run for a period before problems emerge. It depends!
EEPROM
Similar to flash, EEPROM is another form of non-volatile memory that you can use to read and write data. However, you will have to do so byte by byte, which can be slightly more inconvenient than what we’re typically used to. You can think of it as an in between of both flash and SRAM – a read/writable flash or non-volatile SRAM, as you will!
Note: Most EEPROMs have lifespan of around 100,000 write/erase cycles, so be careful with placing EEPROM read / writes in loops!
How to Measure Arduino Memory Usage
Before optimisations, we’ll have to begin our diagnosis by measuring the amount of memory that our program uses.
Flash
It’s super convenient to measure Flash memory – in fact, the Arduino IDE will do it for you! Whenever you compile or upload your code, the IDE will show you exactly how much memory is being used by your upload and what percentage of the selected board’s memory that uses. For example, the sketch I uploaded below uses just 35K or 7% of the Wio Terminal’s flash memory – very comfortable!

EEPROM
You have to write to the EEPROM byte by byte, so you should know exactly which addresses are being used. When in doubt, you should double check your code! While it’s not the main focus of our article, an example of reading and writing data with the EEPROM is shown for reference below. You can also learn more about how to use the EEPROM on an Arduino with the official documentation!
// Write data to a given address
#include <EEPROM.h>
EEPROM.write(address, value);
EEPROM.read(address);
SRAM
To measure the usage of our Arduino’s SRAM, we can use a convenient function call from this arduino library which measures the free RAM available, freeMemory(), which is also defined below.
#ifdef __arm__
// should use uinstd.h to define sbrk but Due causes a conflict
extern "C" char* sbrk(int incr);
#else  // __ARM__
extern char *__brkval;
#endif  // __arm__

int freeMemory() {
 char top;
#ifdef __arm__
 return &top - reinterpret_cast<char*>(sbrk(0));
#elif defined(CORE_TEENSY) || (ARDUINO > 103 && ARDUINO != 151)
 return &top - __brkval;
#else  // __arm__
 return __brkval ? &top - __brkval : &top - __malloc_heap_start;
#endif  // __arm__
}
Recall that the objective when managing SRAM is to avoid a collision between the heap and the stack. Thus, what freeMemory() actually provides us with is the amount of free memory available between them.
Since the size of the heap and the stack will change throughout the program execution (ie. they are dynamic), it’s also important to monitor the free memory available throughout various points of the code by calling the freeMemory() function regularly.
Greatest Memory Offenders
Despite our best efforts to optimise memory, some devices and drivers will simply require more SRAM to function. In those cases, it’s important to identify the offenders and work around them!
Filesystems
If your Arduino interfaces with a SD or MicroSD card, a large memory buffer of 512 bytes will need to be allocated to facilitate the reading and writing of data. If possible, it’s advised to move the contents of your program to your flash memory, since it will also be faster.
Anything with Pixels
OLED displays, RGB lights, you name it – these things hog memory! Each pixel is defined as a combination of Red, Green, Blue (RGB) values, and will consume 3 bytes of SRAM. Don’t underestimate that number, since small displays can already easily have thousands of pixels! Of course, monochrome (single colour) displays will only require 1 byte for every 8 pixels, but that’s still 1K for SRAM for a display as small as 128 by 64 – choose wisely!
TinyML
TinyML is a new concept that aims to bring machine learning to tiny and cost effective microcontrollers. Considering that most ML is done on desktop-class computers, there’s no doubt that this stretches the memory consumption on microcontrollers. If you want to build edge ML applications, you’ll have to be even more careful of memory consumption since it’s necessary to work around the ML model.
If you’re keen to learn more about Edge ML, I highly encourage you to read our previous article here.
Optimising Memory Usage on Arduino
If your program is failing due to a memory problem, you’re in luck. For each type of Arduino memory, there are a few basic modifications that we can make to our code in order to reduce the memory used. With some finesse, you just might be able to once again get it under the memory limits! In this section, we’ll only talk about optimising flash and SRAM, since EEPROM memory tends to be quite straightforward.
Note: Memory optimisation is a deep and advanced topic in the world of computing; deeper knowledge on this subject can certainly bring you much further! The steps shared in this article are just some of the steps that beginners can take to optimise their code!
Optimising Flash Memory
The best way to reduce the size of your program is to identify which of its parts are really necessary, and to eliminate those that aren’t to save space. For example:
- Eliminate unused libraries, functions and variables.
- Look out for unreachable code, such as conditionals that will never be true.
- Consolidate repetitive code by wrapping it in a reusable function.
On the extreme end of things, you can consider eliminating the bootloader to save even more space. However, I wouldn’t recommend this as bootloaders serve several important functions in development processes and can make your life easier. If you’re still keen on making this happen, have a look at our bootloader programming article.
Optimising SRAM
SRAM is the most complex of all three memory types to use, but there are also more options when it comes to optimising it.
Understand the Behaviours
An important aspect of SRAM management that may confuse some beginners has to do with the heap. We know that the heap is used for dynamically allocated variables in the program, but there is an important issue that arises if you don’t use it carefully, known as heap fragmentation. Let’s look at an illustration of a heap to understand this.

The entire heap holds 64KB of memory. Up until Step 3, subsequent allocations take up neighbouring memory addresses, which is rather straightforward. Now, observe what happens when the second allocation is freed. Although we now theoretically have 32KB of free memory like we did in Step 2, the maximum size of any subsequent allocation is now 16KB instead of 32KB! In this case, the memory available from freeing the second allocation is known as buried heap space, and heap fragmentation has occurred.
Buried heap space is not usable by the stack, but can be used for subsequent heap allocations. Hence, poor heap management can cause the heap to grow quickly towards the stack, accelerating a memory corruption!
Use Local Variables
A good way to circumvent the heap problem is to use local variables in your functions. Local variables are variables which are declared inside a function, and are only available for use within that function. This way, the memory usage becomes part of the stack as opposed to the heap. The benefit of this is that the memory used by stacks are completely freed when the function is returned, which allows our code to work in the same manner without opening it up to vulnerabilities from heap fragmentation!
Offloading to Flash / PROGMEM
Normally, our code dynamically loads static variables into SRAM, which wastes precious memory in the heap since we’ll never have to modify them. Fortunately, there are several methods to tell our program to leave such variables out of SRAM, and to instead reference them directly from flash memory.
For Strings:
Literal strings consume a very large amount of memory, but there is fortunately an easy way to reduce their memory usage. By wrapping strings with a F() macro as shown below, we tell the program to store the string in Flash, saving us a ton of precious SRAM!
Serial.println(F(“This is a string that eats a lot of memory, but not anymore!”));For Other Data:
You can also do something similar to other data types by using the PROGMEM modifier. After the data is moved into the Flash memory, you will need to use special functions defined in the pgmspace.h library to read and write data. As you might tell, this presents a slight inconvenience, but is great for reducing SRAM consumption!
Reserve() Memory
The reserve() function creates a buffer for a string that might grow in the future. That way, the program will not have to reallocate memory to the string as it is being modified by the program.
Why is this important? Well, when strings are being modified, it’s common for intermediary variables to be created to facilitate the operation. When this happens, the heap memory allocation gets chaotic and a new section of memory often has to be allocated for the final string object. This creates opportunities for heap fragmentation to occur, which will reduce the memory efficiency of our program!
To use reserve(), you can follow the syntax below. More information can also be found on the official documentation.
myString.reserve(size);
// where myString is a variable of type String
// the number of bytes (unsigned int) in memory to reserve.
Modify Buffer Sizes
Just like we can do with reserve(), different components of our code that work in the backend use buffers to manage memory consumption. However, the buffers allocated can sometimes be excessive for your specific use case. If you need to free up some additional memory, modifying the buffer sizes can be a useful option.
Your Own Buffers – It goes without saying to check the sizes of the buffers you allocate. They shouldn’t be bigger than they need to be!
Libraries – Some libraries also create buffers in the background to help their components run smoothly. If you have the patience to read through the library code, this may be an opportunity to reduce memory consumption.
System Buffers – Different systems will allocate buffers for various backend services, like the 64 byte serial receive buffer. If you’re not intending to use high speed serial communication, you can reduce the buffer size that is defined in the HardwareSerial.h file in your Arduino installation by modifying the following line:
#define SERIAL_BUFFERSIZE 64Use the Right Data Types
Different data types use different amounts of memory! You can vastly reduce the amount of memory used by your code if you use the smallest data type where possible. For example, use a byte instead of an integer, and an integer instead of a float!

Arduino Recommendations
In the worst case, the amount of physical memory that your Arduino board has may simply not be sufficient for the application you are trying to build. Fortunately, Seeed offers a number of Arduino-compatible microcontroller boards that are sure to provide you with enough power and memory to get the job done!
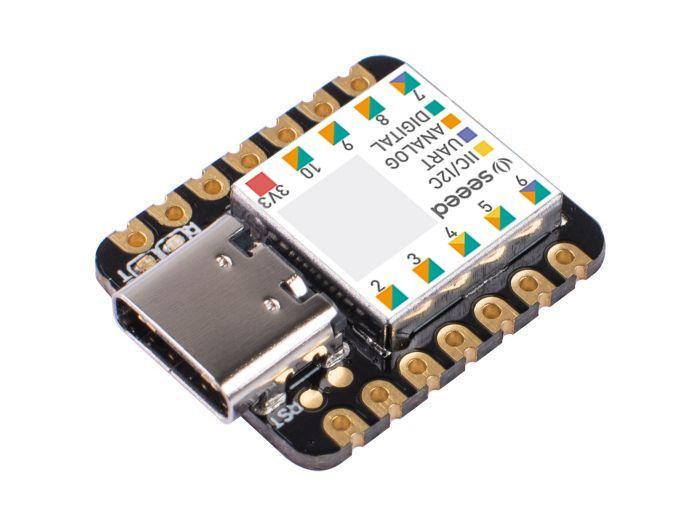
Seeeduino XIAO
The Seeeduino XIAO is the smallest Arduino compatible board in the Seeeduino Family. Despite its small size, the Seeeduino XIAO is equipped with the powerful SAMD21 microchip and a variety of hardware interfaces. With 256KB Flash and 32KB SRAM, the Seeeduino XIAO houses 16 times more SRAM than the popular Arduino UNO!
Product Features:
- ARM Cortex-M0+ 32bit 48MHz microcontroller (SAMD21G18) with 256KB Flash, 32KB SRAM
- Compatible with Arduino IDE & MicroPython
- Easy Project Operation: Breadboard-friendly
- Small Size: As small as a thumb (20×17.5mm) for wearable devices and small projects
- 11 digital/analog pins, 10 PWM Pins, 1 DAC output, 1 SWD Bonding pad interface, 1 I2C interface, 1 UART interface, 1 SPI interface
Keen to learn more about the Seeeduino XIAO? Visit its product page on our Seeed Online Store now!
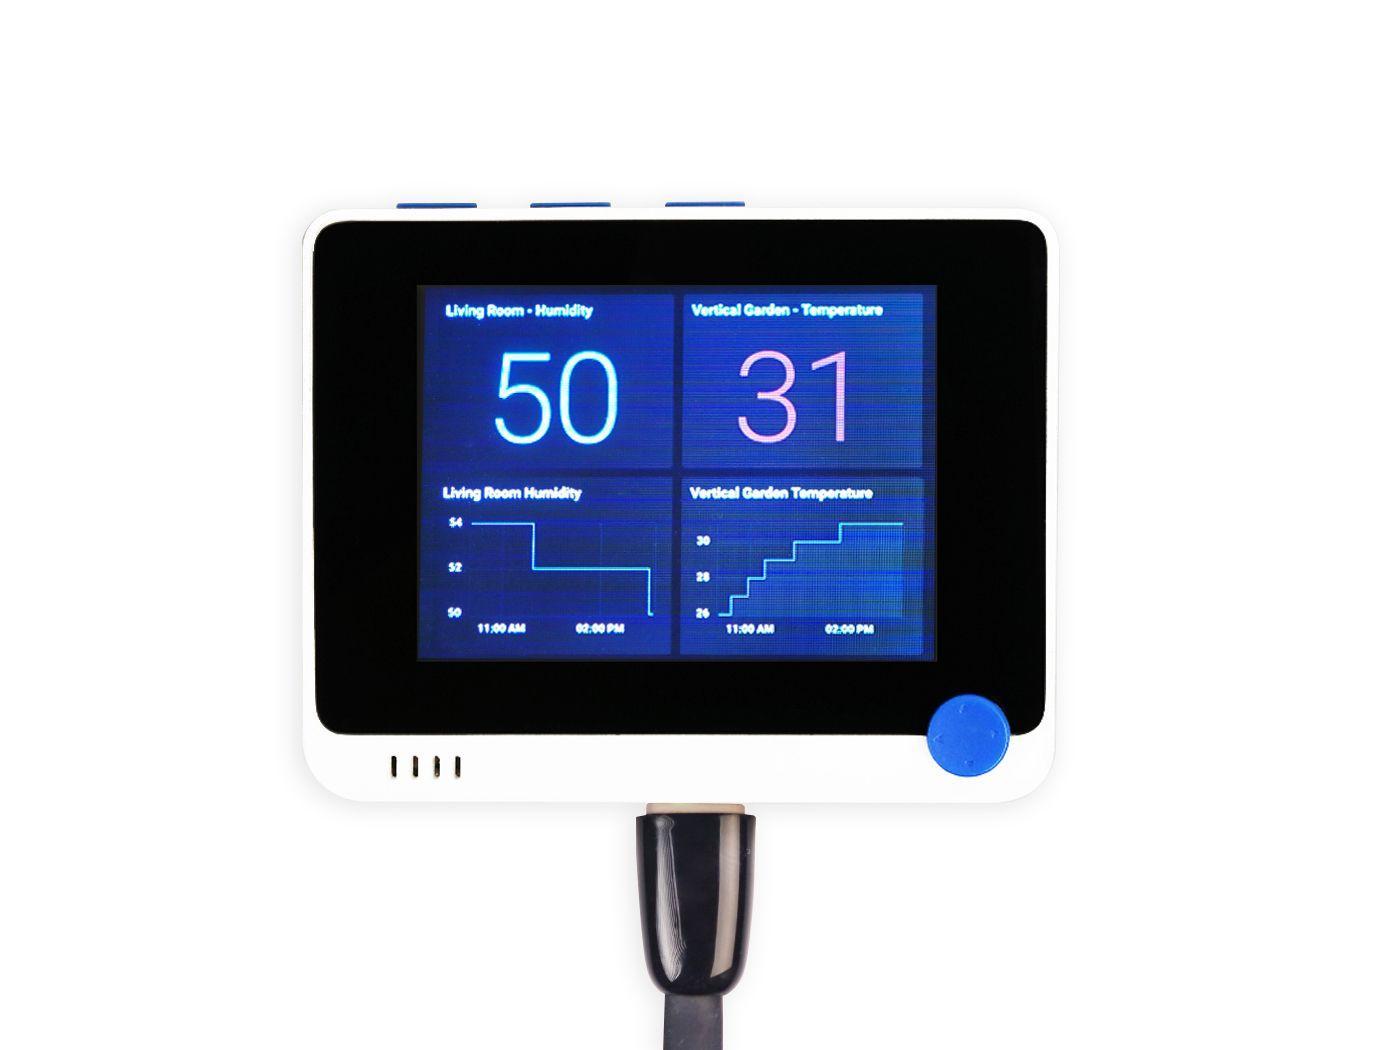
Wio Terminal
The Wio Terminal is a complete Arduino development platform based on the ATSAMD51, with wireless connectivity powered by Realtek RTL8720DN. An all-in-one microcontroller, it has an onboard 2.4” LCD Display, IMU, microphone, buzzer, microSD card slot, light sensor & infrared emitter. With a whopping 4MB of flash memory and 192KB of RAM, it’s a perfect candidate for memory intensive uses like TinyML!
Product Features:
- Powerful MCU: Microchip ATSAMD51P19 with ARM Cortex-M4F core running at 120MHz
- Reliable Wireless Connectivity: Equipped with Realtek RTL8720DN, dual-band 2.4GHz / 5GHz Wi-Fi (supported only by Arduino)
- Highly Integrated Design: 2.4” LCD Screen, IMU and Compact Enclosure with built-in magnets & mounting holes
- Raspberry Pi 40-pin Compatible GPIO
- Compatible with over 300 plug&play Grove modules to explore with IoT
- USB OTG Support
- Support Arduino, CircuitPython, Micropython, ArduPy, AT Firmware, Visual Studio Code
- TELEC Certified
If you’re interested to pick up a Wio Terminal, please visit its product page on the Seeed Online Store!
Summary
That concludes today’s article on managing Arduino memory! This has been a very simple introduction to understanding how the different types of memories on the Arduino, as well as how to make better use of them. Just remember, these suggestions are merely the tip of the iceberg, and there are many more ways to optimise memory usage, like understanding the space complexity of the code write! In any case, I hope you’ve now gotten a better idea of where to start!
If you’d like to learn more, it may be worth your while to give the following content a read:
- Edge AI – What is it and What can it do for Edge IoT?
- Arduino Bootloader Programming – Getting Started with ARM Microcontrollers
- Multitasking with Arduino – Millis(), RTOS & More!
- RTOS Basics: Getting Started with Microcontrollers