Build a Raspberry Pi Line Following Robot!
Today, we’re going to show you how to get started with the popular line following robot project with your Raspberry Pi SBC and Grove, step by step for beginners!
A line following robot is a robot which is capable of following a path that is predefined by a line on the ground. Although there are many ways to achieve line following in a robot, the most basic ones use infrared (IR) sensors to help the robot keep track of the line.
Why Make Line Following Robots?
While this project is for beginners, don’t look down on the capabilities of a self-navigating robot. Today, these robots are used widely for logistics purposes in stores, warehouses and industries. Even big companies like Amazon use robots for their warehouses, saving costs and creating safer working environments!
While industry-standard robots are surely more advanced than the one we are creating today, make no mistake – this is a great place to start!
Line Following Robot Projects
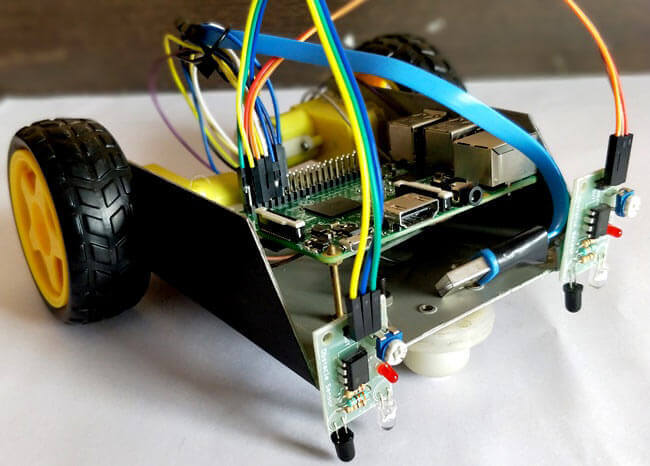
The fact that there are so many tutorials for making line following robots is testament to just how interesting and educational this project is! For example, take a look at this line following robot created by Circuit Digest.
How about this one by Aarav G on Instructables?
Yet, one thing’s for certain – that’s a lot of wiring for a beginner project! If you’re keen to build your very own line following robot but have been kept away by the hardware, we’ve got the right solution for you today.
Building with Grove Ecosystem
We can simplify the hardware building process greatly if we use the Raspberry Pi with it’s Grove Base Hat!
Grove is a modular and easy-to-use electronics connection interface. With plug-and-play capabilities and extensive documentation, Grove is an easy way to get started with electronics projects for beginners! You can read more about Grove here.
To follow along with our tutorial, we recommend the following parts:
- 1x Raspberry Pi 4B 4GB
- 1x Grove Base Hat for Raspberry Pi
- 1x Grove – I2C Motor Driver (L298P)
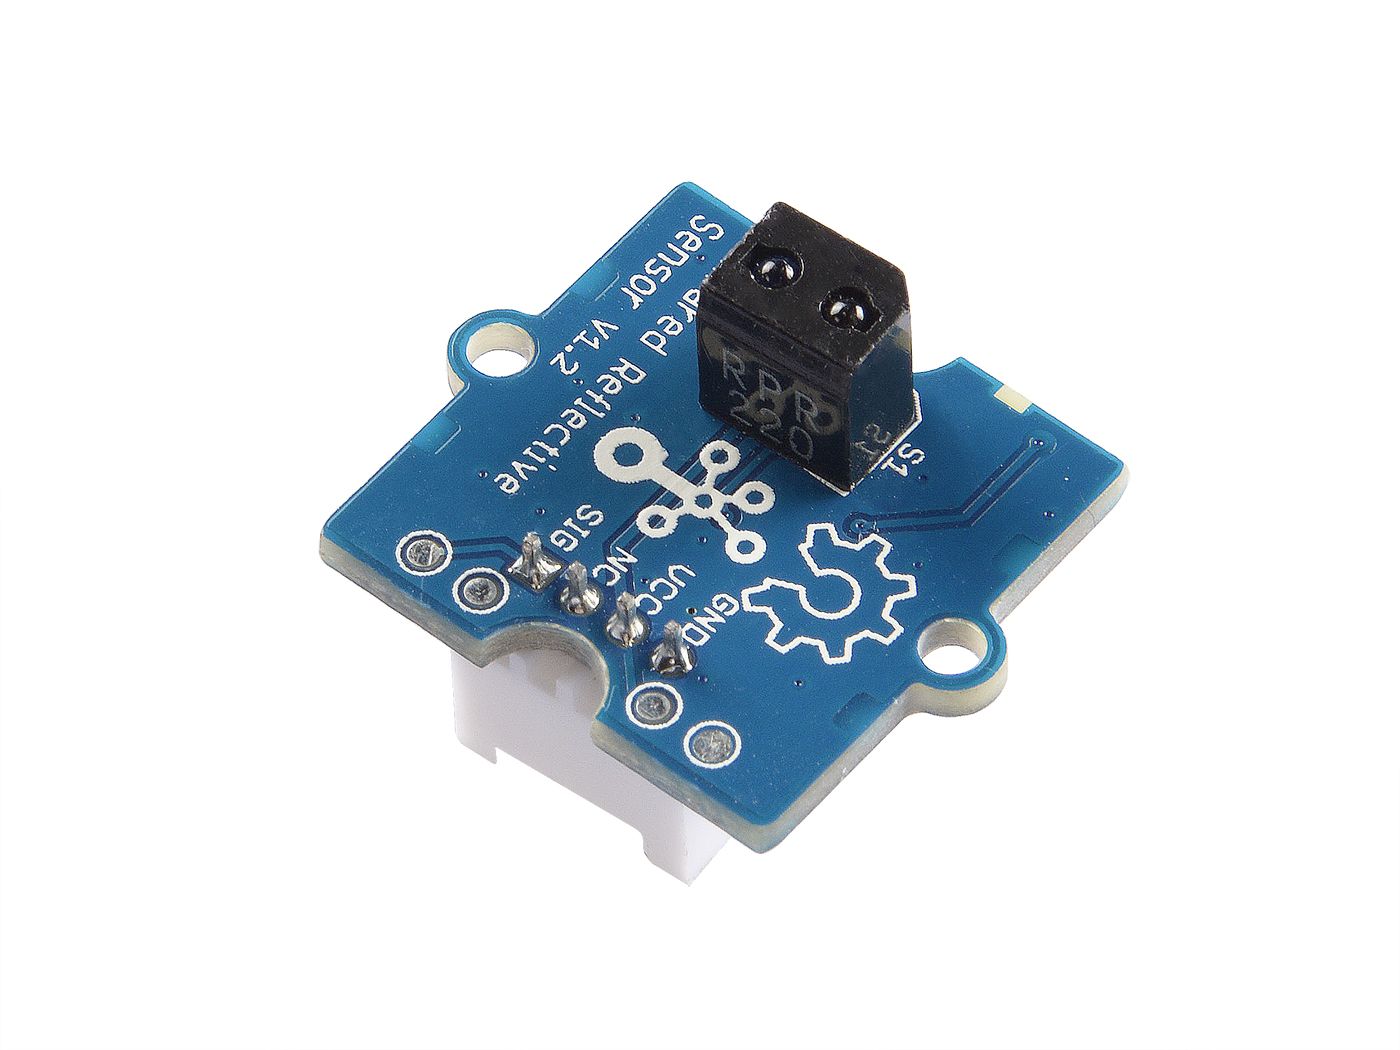
- 2x Grove – Infrared Reflective Sensor v1.2
- 2x TT Motor Dual output shaft (1:48)
- 2x Robot cars Wheel-65mm-TT Motor
- 1x 18650 Battery Holder Case – 2 Slot with Switch
- Some dual male jumper wires
Finally, you’ll want to get yourself a chassis, which will serve as the robot’s ‘body’ and house the electrical components!
Note: If this is your first time working with a Raspberry Pi SBC, we recommend you get started with this Seeed Wiki page first. It will take you through the setup process so that you’ll be ready to follow along with the rest of this tutorial!
How does an IR Line Following Robot work?
Let’s look at the parts and concepts behind what’s going to make our robot work, starting from the IR sensors.
Introduction to IR Sensors
An IR sensor consists of an IR transmitter (IR LED) and an IR receiver (a photodiode). The transmitter will produce infrared light, whereas the receiver will wait to receive the light when or if it has been reflected by a surface.
White surfaces will reflect the IR light just fine. However, since black surfaces will absorb the IR light, the receiver will not receive the reflection. This allows us to use the IR sensor to distinguish between white and black surfaces – such as when the sensor is on or off a line. Great!
Following Paths with 2 IR Sensors
To follow our line, we will need two IR sensors, placed on each side of the line. When both IR sensors are not on the line, our robot will simply go straight.
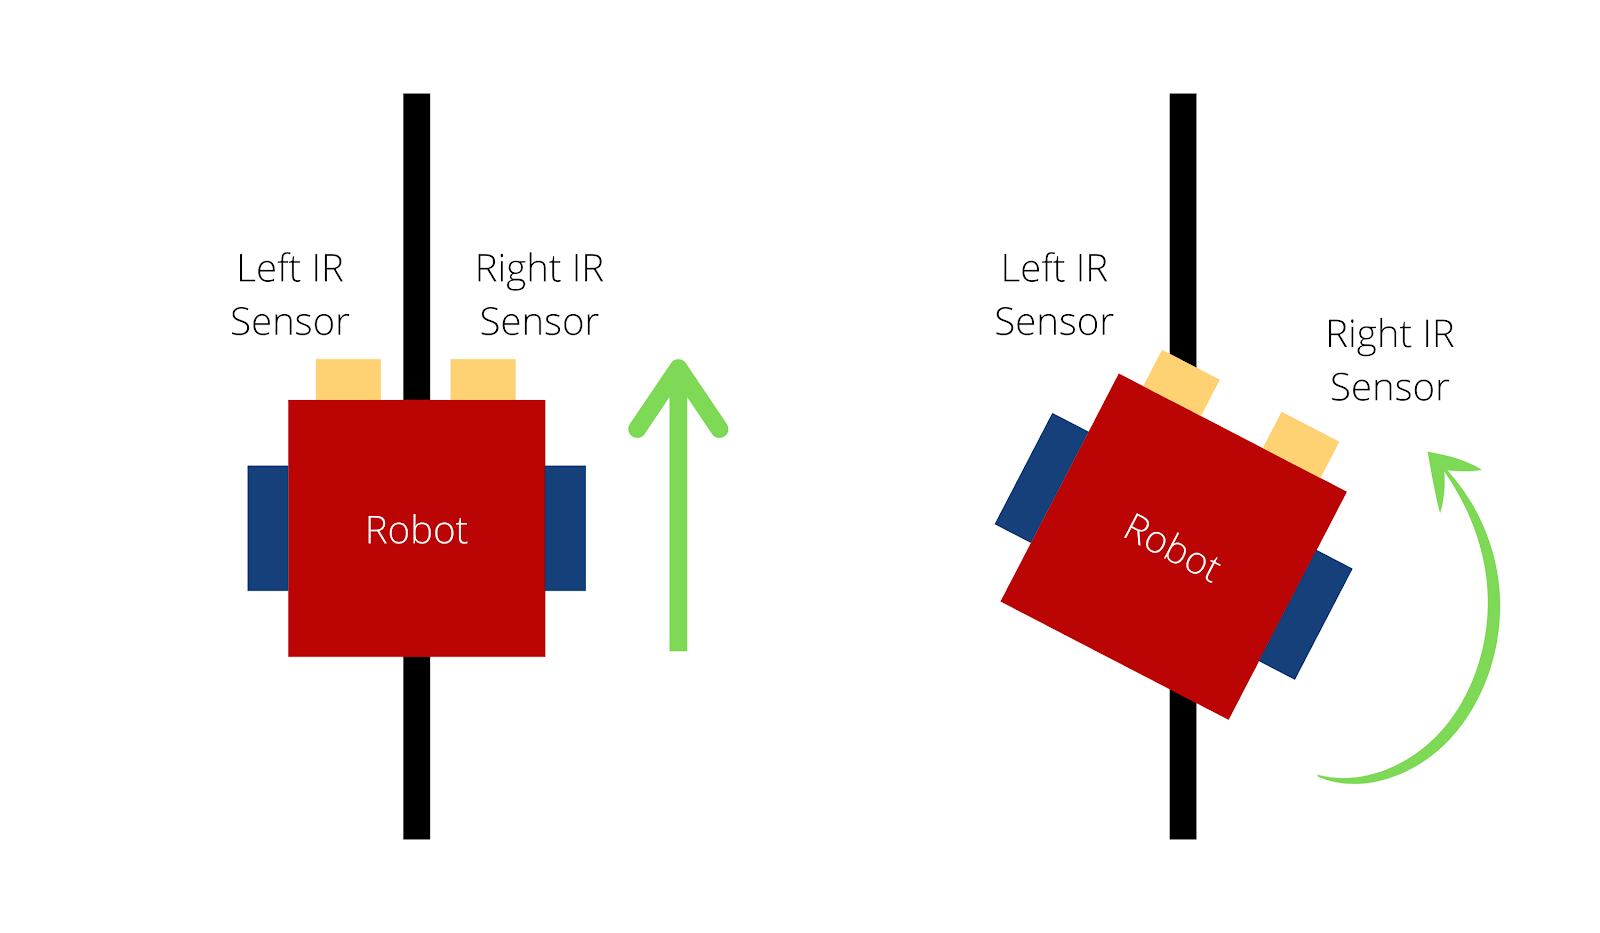
When one sensor is on the line while the other is not, we will have to tell the robot to turn in the direction of the first sensor. For example, when the left IR sensor detects the line but the right one does not, we will want the robot to turn left so that we stay on the line, and vice versa.
Schematic and Outline
Now that we know how the robot will follow its line, we have to fill in the gaps between the sensor data and the robot’s motion. Let’s first look at the schematic below.
At the center of our robot is the Raspberry Pi, which will essentially serve as our ‘brain’. It will receive the data from the two sensors, then issue controls to the two motors through a motor driver to achieve our desired movement.
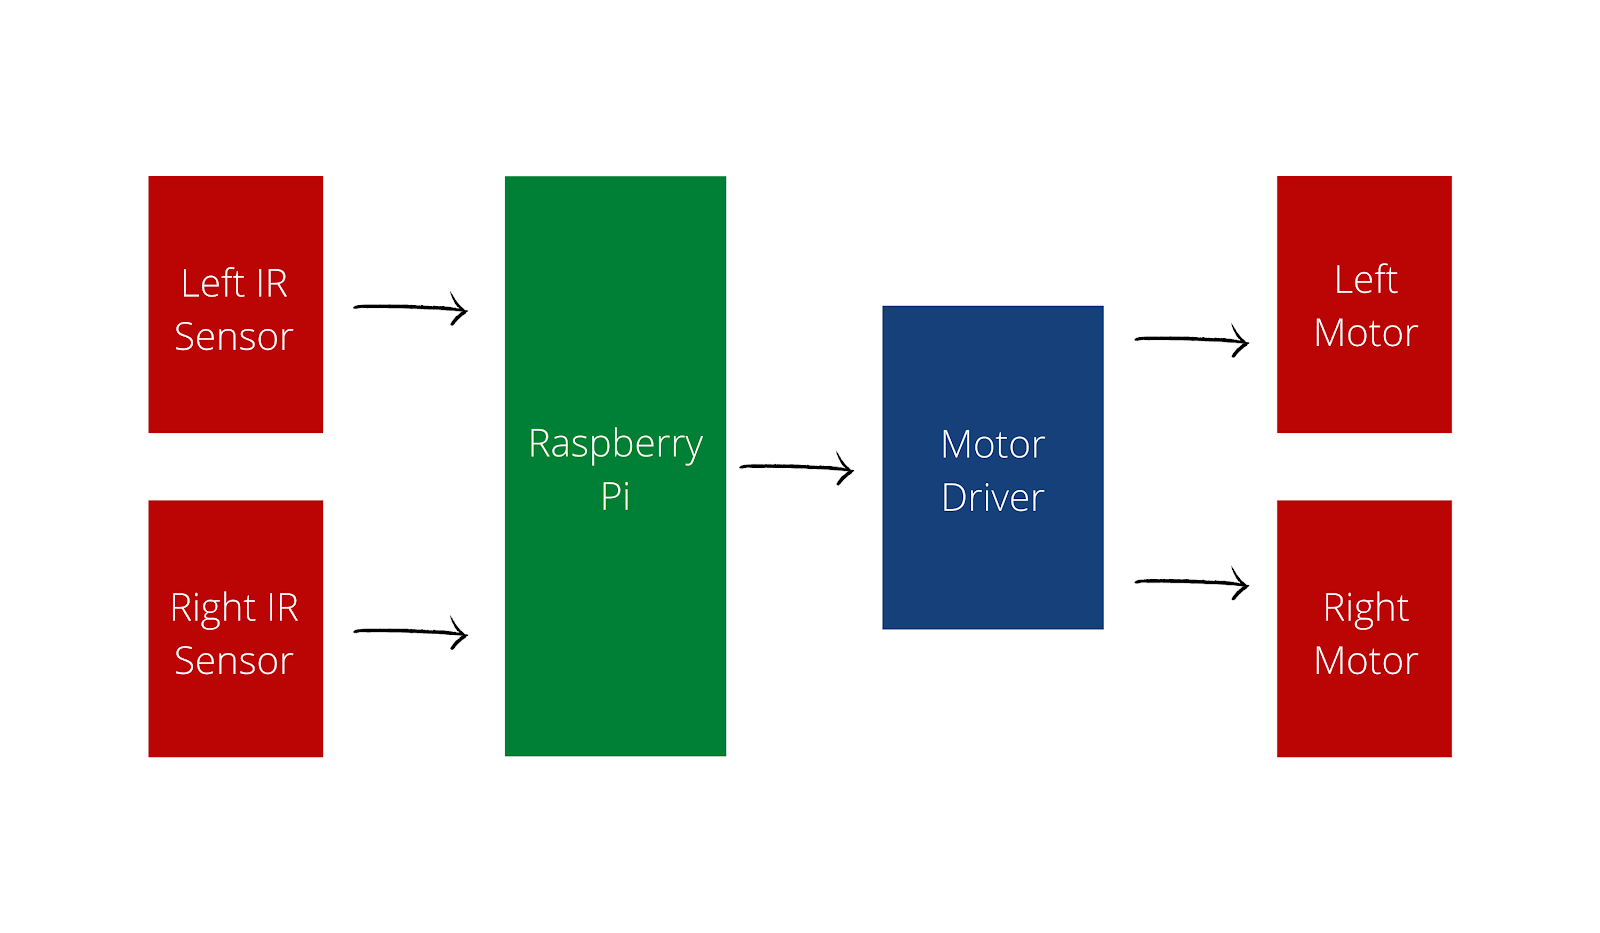
A motor driver is necessary since the Raspberry Pi’s GPIO pins can only output a maximum of 5V. If we want to have more torque in our motors to allow our robot to carry heavier loads, we will need more power.
In short, the motor driver allows us to receive controls from the Raspberry Pi while powering our motors from another more powerful power source. It will also allow our motors to operate bi-directionally – meaning a single wheel can move both forwards and backwards – what we need to change direction!
Motor Control and Movement
To tell our robot to move left or right, we have to issue a combination of commands to each of the motors. The combination of individual wheel directions and their resulting motion are shown below – You can experiment and verify this for yourself!
| Left | Right | Resulting Movement |
| Forward | Backward | Turn Right |
| Backward | Forward | Turn Left |
| Forward | Forward | Go Straight |
| Backward | Backward | Reverse |
Let’s Wire our Robot Up!
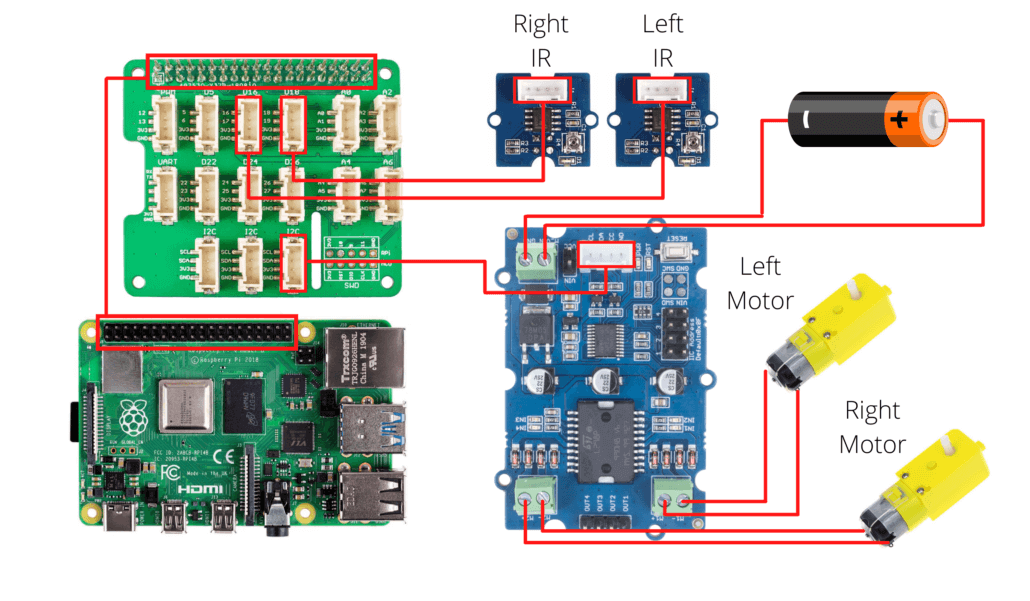
Now that all the theory is out of the way, let’s begin constructing our line following robot! If you’ve picked up all the items we’ve recommended, you can directly follow the schematic below.
Take note!
- The Grove base hat will sit on top of the Raspberry Pi and enable us to connect to our grove accessories.
- Ensure that the batteries used have sufficient voltage to drive our motors. For a complete guide, visit our Guide: Batteries for Embedded Devices.
- Take note of the Grove connections with the hat! In the schematic above, the IR sensors are connected to our D16 and D18 digital connections, while our motor driver is connected to the I2C connection.
- Ensure that the two IR sensors are facing towards the ground! Also be sure to leave enough space between them to accommodate the width of your line.
- Remember to make power considerations for your Raspberry Pi too! A typical USB power bank should do the trick.
We look forward to seeing what kind of line following robot you will create, so have fun with the form factor of your robot while constructing!
What about Software?
Of course, our robot won’t magically work just on hardware alone – It’s now time to work with our Raspberry Pi!
We will use Python to programme the behaviour of our robot. Fortunately, since we are using the Grove ecosystem, we also have the convenient Grove Python library to work with.
First, install the Grove library on your Raspberry Pi through its command line interface (CLI):
git clone https://github.com/Seeed-Studio/grove.py
cd grove.py
sudo ./install.sh
Then, we have the code for the main program as follows. You can create a python file (.py extension) with your favourite text or code editor.
If you’re new to programming, all that’s going on in our code is simply what we’ve already discussed so far in theory – reading in our IR sensor data and controlling the motors accordingly!
from grove.gpio.gpio_rpi import GPIO
from grove.grove_i2c_motor_driver import MotorDriver

GPIO.setwarnings(False)
GPIO.setmode(GPIO.BCM)

Left_IR = GPIO(16, direction = GPIO.IN) #GPIO 16 -> Left IR out
Right_IR = GPIO(18,direction = GPIO.IN) #GPIO 18 -> Right IR out

# Initialise our motor driver controls
motor = MotorDriver()

while 1:
   if(GPIO.read(16)==True and GPIO.read(18)==True): #both forward
       MotorDriver.set_dir(clock_wise1 = True, clock_wise2 = True)
       MotorDriver.set_speed(speed1 = 80, speed2 = 80)

   elif(GPIO.read(16)==False and GPIO.read(18)==True): #turn left
       MotorDriver.set_dir(clock_wise1 = False, clock_wise2 = True)
       MotorDriver.set_speed(speed1 = 50, speed2 = 50)

   elif(GPIO.read(2)==True and GPIO.read(3)==False): #turn right
       MotorDriver.set_dir(clock_wise1 = True, clock_wise2 = False)
       MotorDriver.set_speed(speed1 = 50, speed2 = 50)

   else:  #stop
       MotorDriver.set_speed(speed1 = 0, speed2 = 0)
Note: Be sure to change the GPIO pin numbers according to how you have plugged in your IR sensors. You may also have to tinker around with the motor directions depending on how you hooked your robot up.
Now that our programme is ready to run, simply run your python file with your own file path with the following command. I’ve named my python file linefollower.py, but you can choose whatever you like and run it like below.
python <file_path>/linefollower.pyYou can stop the program with Control + C on your keyboard.
Remote Controlling our Raspberry Pi
At this point, your Raspberry Pi has probably already been installed onto your robot. This can make it difficult to hook it up to use with a monitor, mouse and keyboard. If you have to troubleshoot your code back and forth on your Raspberry Pi, it can be much more convenient to use an SSH connection over WiFi to control your program.
With SSH, we can even edit our python code by using a CLI text editor like nano:
sudo nano <path>/<filename>.py
Visit our 3 Methods to Configure WiFi on the Raspberry Pi tutorial for more.
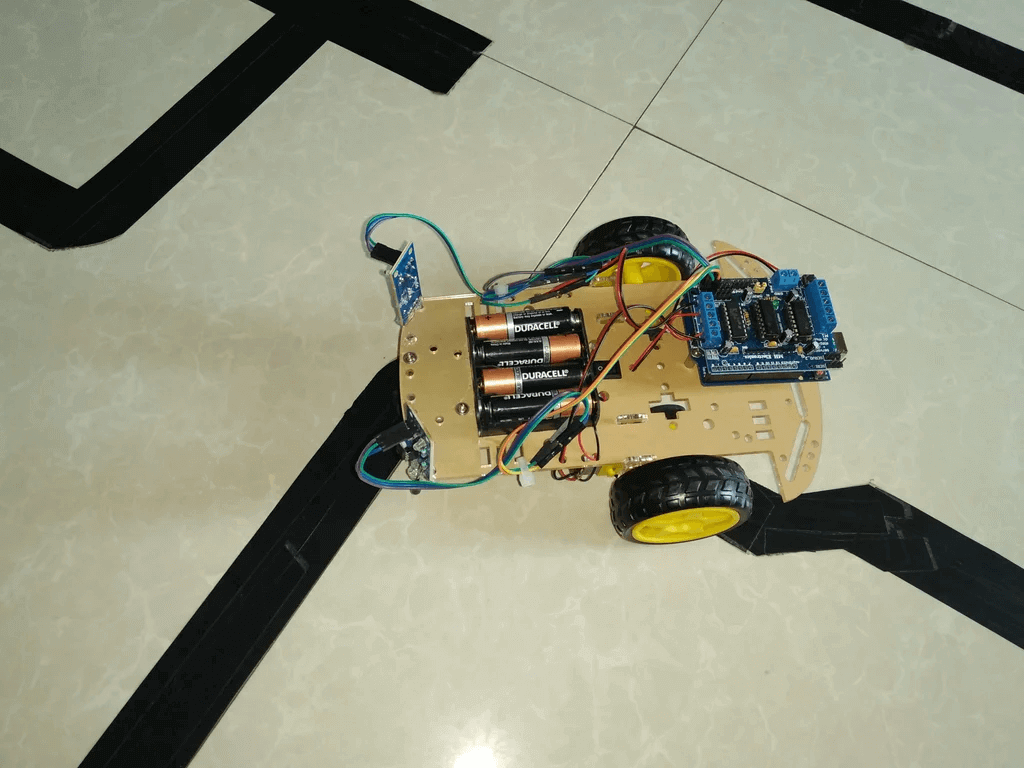
Testing Our Line Following Robot
This is the moment you’ve been waiting for! Set up your own track with some black tape on the floor and watch your robot go!
Don’t worry if it doesn’t work on the first try – troubleshooting and solving problems is probably one of the most important experiences of making your own robot!
You can also explore other ways to improve your robot’s line following abilities, such as adjusting your motor output values.
While I unfortunately do not have the materials to build the robot, here’s a wonderful demonstration by CircuitDigest of what the end-product should look like.
Summary
In this article, we’ve covered how to build your very own line following robot, going all the way from concepts and schematics to the hardware and software implementations. We hope you had fun following along with our tutorial!
For beginners who want to learn more about the Raspberry Pi and other robotics projects, please visit:
- 28 Raspberry Pi Linux Commands: A Quick Guide to Use the Command Line for Raspberry Pi
- How to build a Raspberry Pi Robot? Kits and Projects to get started
- Top 35 Raspberry Pi 4 Projects That You Must Try Now
Advanced Robotic Navigation – LiDAR and SLAM
Although a line following robot will work perfectly for some cases, advanced robotic designs work away from this design since it can be costly to build line paths, especially in large factories.
In those cases, we can use a technique known as SLAM (or Simultaneous Localisation and Mapping). By using a LiDAR (or Light Detection & Ranging) sensor, our robot will build a 3D map of the world around it, figure out its position, and identify a path towards its destination.
If this sounds exciting to you, be sure to check out some of our LiDAR and SLAM articles!
- What is a LiDAR Sensor? – Technology, Uses, Projects
- What is a Time of Flight Sensor and How does a ToF Sensor work?
- RPLIDAR and ROS programming – The Best Way to Build Robot
For background knowledge, you may be interested to read the following:
- Simultaneous localization and mapping – Wikipedia
- Self-Driving Robot Navigation Methodology Explained – Aethon