Learn TinyML using Wio Terminal and Arduino IDE #1 Intro
This article is the first article of the series about TinyML. For more details and video tutorial, watch the corresponding video!
Let’s start by explaining what is TinyML.
ML as you might have guessed stands for Machine Learning and in most of cases (not always though) nowadays refers to Deep Learning. Tiny in TinyML means that the ML models are optimized to run on very low-power and small footprint devices, such as various MCUs. It is a subset of ML on the Edge or Embedded Machine Learning.
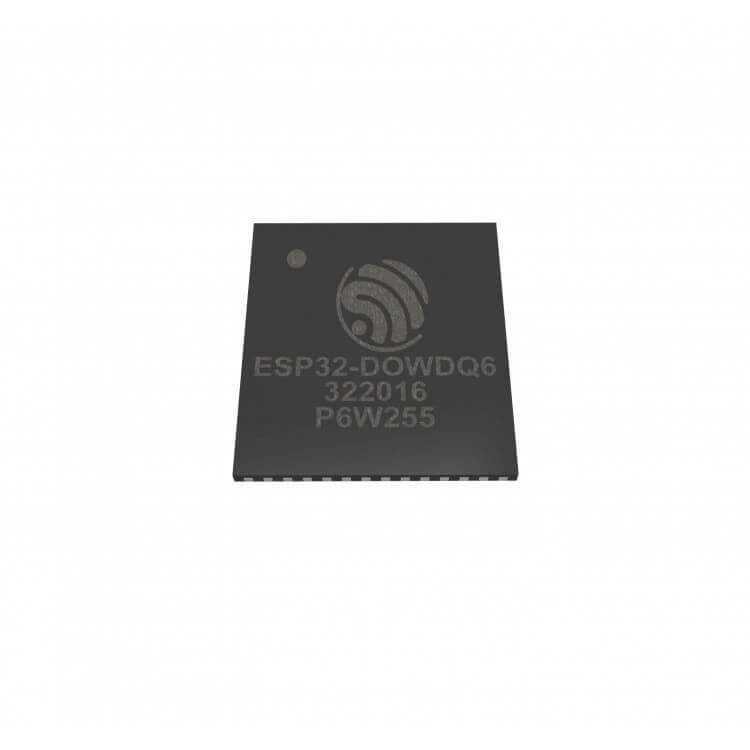
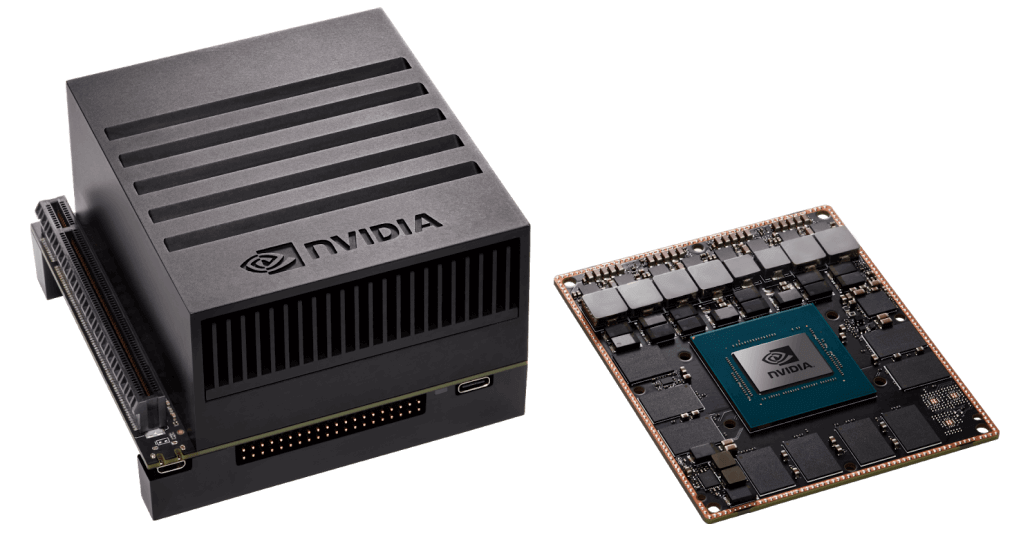
Embedded devices come in all sorts of shapes and sizes, starting from “embedded supercomputer” Nvidia Jetson Xavier AGX to the tiniest of microcontrollers, for example ESP32 or Cortex M0. Why embedded ML on microcontrollers is put in a special category and even given its own cool name?
Because it comes with it’s own set of advantages and limitations. The attraction of TinyML is in fact that MCUs are ubiquitous, small, consume small amounts of energy and comparatively cheap. Take ARM Cortex M0+ and the little Seeeduino XIAO board which is built around it – the board is as small as a thumb(20×17.5mm) , consumes only 1.33 mAh of power (which means it can work ~112 hours on a 150 mA battery, much more if put in deep sleep) and cost as little as 4.3 USD.
Thanks to recent improvements in model optimization and emergence of frameworks specifically created for running machine learning model inference on microcontrollers, it has became possible to give more intelligence to these tiny devices. We now can deploy neural networks on microcontrollers for audio scene recognition (for example elephant activity or sound of breaking glass), hot-word detection(to activate device with a specific phrase) or even for simple image recognition tasks. The devices with embedded microcontrollers can be used to give new life and meaning to old sensors, such as using an accelerometer installed on a mechanism for anomaly detection and predictive maintenance – or to distinguish various kinds of liqueurs as in this demo! The possibilities of TinyML are truly huge.
What about limitations? The main limiting factor is RAM/FLASH size of MCUs – no matter how you well optimize, you wouldn’t be able to fit that YOLO9999 into a tiny microcontroller.

Same goes for automatic speech recognition – while simple hot word (or voice command detection) is possible, open domain speech recognition is out of reach of MCUs. For now.
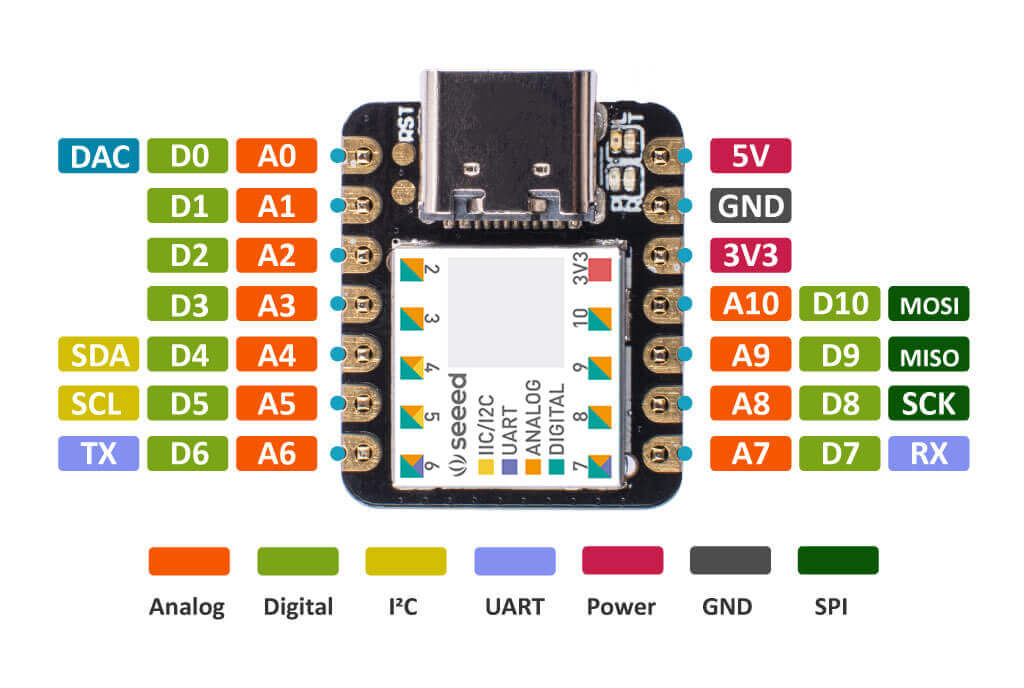
In this series of videos we’ll mainly be using ARM Cortex M4F core inside Wio Terminal development board and, as bonus content, ARM Cortex M0+ core inside of XIAO devboard. Wio Terminal is a perfect tool to get started with IoT and TinyML – it is built around ATSAMD51P19 chip with ARM Cortex-M4F core running at 120MHz, which is very well supported by various frameworks for ML inference on microcontrollers.
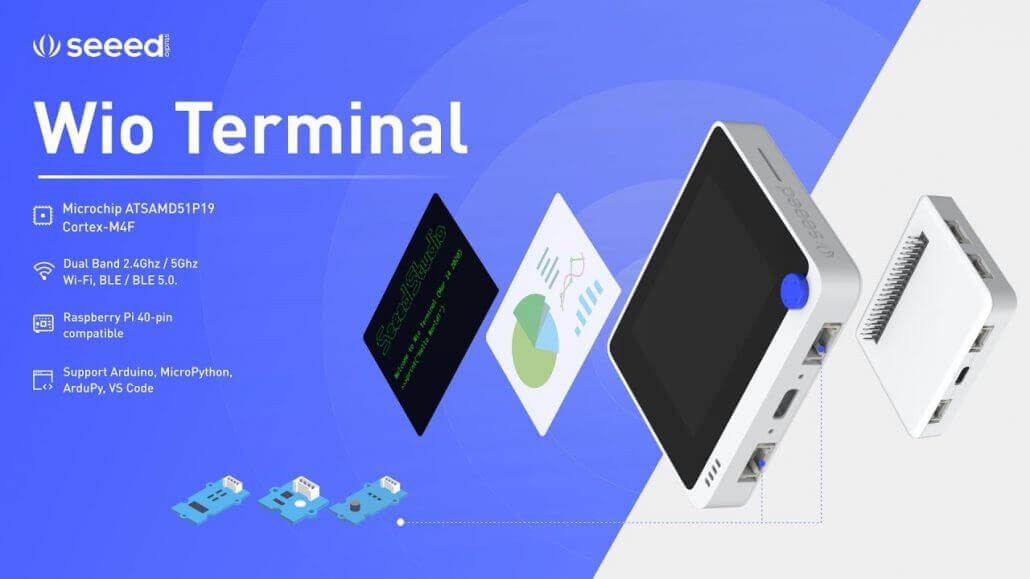
The board also has
- built-in light sensor
- microphone
- programmable buttons
- 2.4 inch LCD display
- accelerometer
- 2 Grove ports for easy connection of more than 300 various Grove ecosystem sensors
The list goes on, for full specs have a look at Wio Terminal Wiki page here.
Software-wise we will be using Arduino IDE for programming the devices and a mix of Edge Impulse and Tensorflow Lite for Microcontrollers for model training and inference.

Edge Impulse is a user-friendly development platform for machine learning on edge devices, providing beginner friendly (yet powerful) web interface and toolkit for whole TinyMl pipeline, from data collection all the way to model deployment. In later articles I will also demonstrate how you can use pure Tensorflow Lite for Microcontrollers to implement your own model training and inference pipeline.
For this article, let’s quickly train and deploy a simple neural network for classifying rock-paper-scissors gestures with just a single light sensor.

Don’t believe it’s possible? Well, let’s find out!
We start by registering an account on https://www.edgeimpulse.com/. Then, since Wio Terminal is at the moment is a Community supported board and doesn’t have all built-in sensors data collection pipeline implemented yet, we will use data forwarder tool from edge-impulse-cli to gather data samples.
Install Node.JS 12 on your computer using snap package, then execute
npm install -g edge-impulse-cli
If (or “when” to be precise) you run into permission problems on Linux, configure Node.js to install packages into a different folder than usr/lib.
After edge-impulse-cli is installed create a new project in Edge Impulse Dashboard and prepare to gather the data. You can forward any type of sensor data to Edge Impulse platform with data forwarder – here is a sample code for forwarding arbitrary sensor data (in this example accelerometer) from device:
#include <Arduino_LSM9DS1.h>

#define CONVERT_G_TO_MS2    9.80665f
#define FREQUENCY_HZ        50
#define INTERVAL_MS         (1000 / (FREQUENCY_HZ + 1))

void setup() {
    Serial.begin(115200);
    Serial.println("Started");

    if (!IMU.begin()) {
        Serial.println("Failed to initialize IMU!");
        while (1);
    }
}

void loop() {
    static unsigned long last_interval_ms = 0;
    float x, y, z;

    if (millis() > last_interval_ms + INTERVAL_MS) {
        last_interval_ms = millis();

        IMU.readAcceleration(x, y, z);

        Serial.print(x * CONVERT_G_TO_MS2);
        Serial.print('\t');
        Serial.print(y * CONVERT_G_TO_MS2);
        Serial.print('\t');
        Serial.println(z * CONVERT_G_TO_MS2);
    }
}
If you have multiple sensor values in one packet, each sensor value should be separated with a comma or tab character. The end of the packet is denoted by a new line character, so you can just use Serial.println for last value in a packet. In this project we just have one sensor that sends one value in each packet.
#define INTERVAL_MS 25

void setup() {
    Serial.begin(115200);
    Serial.println("Started");
    }

void loop() {
    static unsigned long last_interval_ms = 0;
    float light;

    if (millis() > last_interval_ms + INTERVAL_MS) {
        last_interval_ms = millis();
        light = analogRead(WIO_LIGHT);
        Serial.println(light);
        //Serial.print('\t');
    }
}
Once you uploaded the code to Wio Terminal, run
edge-impulse-data-forwarder
and log in with your Edge Impulse credentials. Now you are ready to receive data in Edge Impulse dashboard.
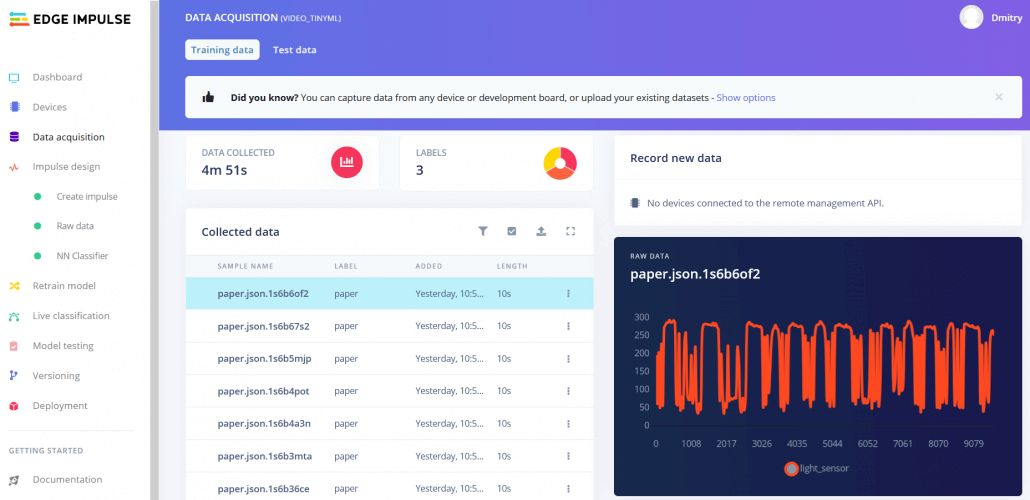
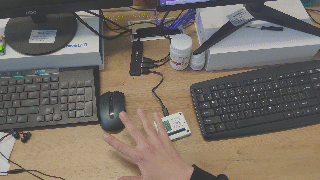
Set sample length to about 10000 ms or 10 seconds and create 10 samples for each gesture, waving the hand in vicinity of Wio terminal.
This is a small dataset, but we also have a tiny neural network, so underfitting is more likely than overfitting in this particular case. When collecting samples it is important to provide diversity for model to be able to generalize better, for example have samples with different direction, speed and distance from sensor. In general, the network only can learn from data present in the dataset – so if the only samples you have are gestures being moved from left to right above the sensor, you shouldn’t expect trained model to be able to recognize gestures being moved right to left or up and down.
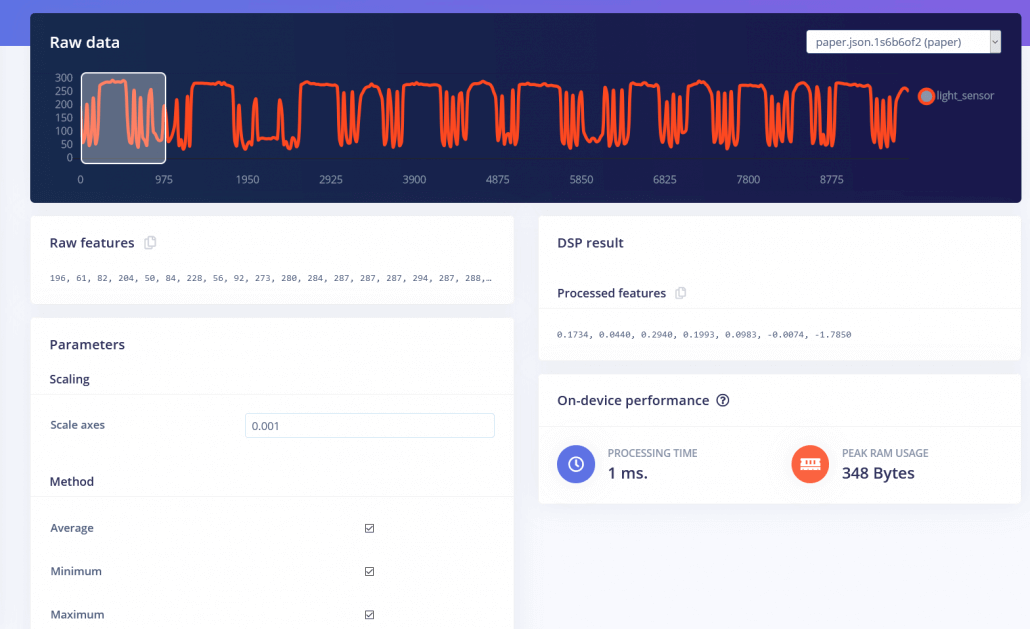
After you collected the samples it is time to design an “impulse”. Impulse here is the word Edge Impulse used to denote data processing – training pipeline. I’d say currently is is the weakest spot of Edge Impulse interface – there is a lot of options, but not so much documentation, which can leave you confused, unless you have background in Data science and/or Digital Signal Processing. For this proof-of-concept project, I have tried three different prepossessing blocks with default parameters(except for adding scaling) – I started with Flatten block, which takes computes Average, Min, Max and other functions of raw data within time window.
I have also tried Spectral Features block, which extracts the frequency and power characteristics of a signal over time
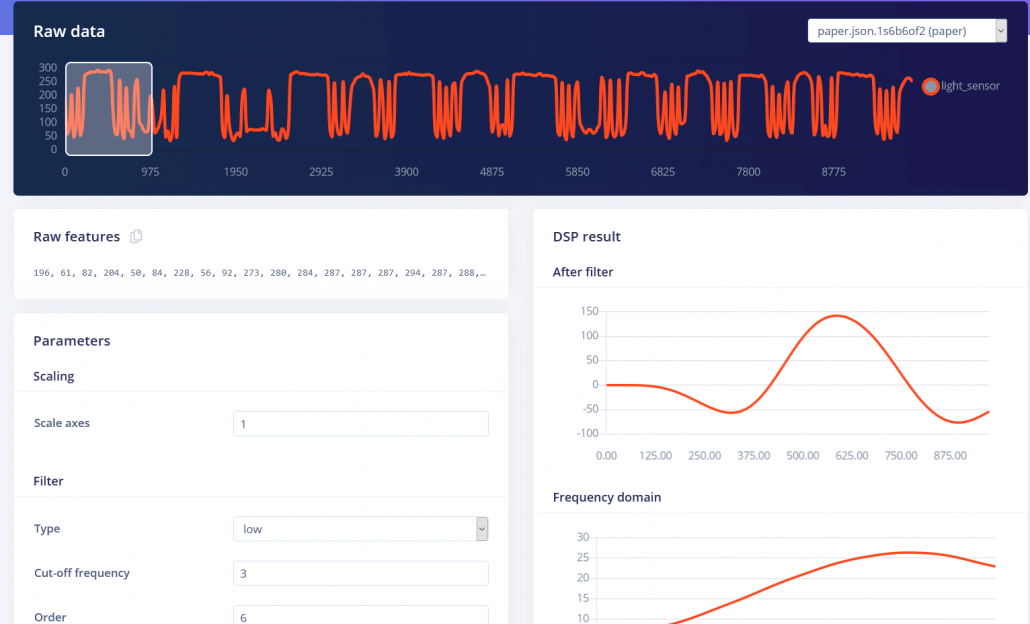
and Raw data block, which as you might have guessed just feeds raw data to NN learning block (optionally normalizing the data). I then went on training simple fully-connected network with 2 hidden layers, 20 and 10 neurons in each hidden layer respectively for Flatten and Spectral Features processing blocks and a 2-layer Convolutional network for Raw features. Here are the Keras API codes for both networks (it’s easier for me to understand what’s going on by reading code, than looking at blocks in the interface)
Fully-connected:
# model architecture
model = Sequential()
model.add(Dense(20, activation='relu',
    activity_regularizer=tf.keras.regularizers.l1(0.00001)))
model.add(Dense(10, activation='relu',
    activity_regularizer=tf.keras.regularizers.l1(0.00001)))
model.add(Dense(classes, activation='softmax', name='y_pred'))
Convolutional:
# model architecture
model = Sequential()
model.add(Reshape((int(input_length / 1), 1), input_shape=(input_length, )))
model.add(Conv1D(8, kernel_size=4, activation='relu', padding='same'))
model.add(MaxPooling1D(pool_size=2, strides=2, padding='same'))
model.add(Conv1D(16, kernel_size=2, activation='relu', padding='same'))
model.add(MaxPooling1D(pool_size=2, strides=2, padding='same'))
model.add(Flatten())
model.add(Dense(classes, activation='softmax', name='y_pred'))
The final results after training for 500 epochs with 1e-4 learning rate and Adam optimizer(beta_1=0.9, beta_2=0.999), batch size 32 were
- Flatten FC 69.9 % accuracy
- Spectral Features FC 70.4 % accuracy
- Raw Data Conv1D 92.4 % accuracy
To dissect the performance of the models, it is important to look at the data and how it is processed. Both Flatten and Spectral Features processing blocks remove the time relationship within each window – Flatten block simply turns the raw values, that are initially in sequence to Average, Min, Max, etc. values calculated on all values in time window, irrespective of their order. Spectral Features block extracts the frequency and power characteristics and the reason it didn’t work that well for this particular task is probably that the duration of each gesture is too short.
If we think about it, for classifying rock-paper-scissors gestures we just need to count how many times and for how long the light sensor has received “lower-than-normal” values. If it is one relatively long time – then it is rock (fist passing above the sensors). If it is two times, then it is scissors. Anything more than that is paper. Sounds easy, but preserving time series data is really important for neural network to be able to learn this relationship in data points.
We could have just used a simple fully-connected NN to work on raw data as well – but that would unnecessarily increase the size of the network. With 40 Hz frequency and time window size of 1000 ms we have 40 data points in each window, so 40 inputs multiplied by 20 neurons in the first hidden layer gives us 800 weights. By using Conv1D layers, we can get away with just 40 weights in the first hidden layer instead and then use MaxPool layers to reduce size of feature maps.

We will discuss Convolutions and how useful they are in later articles about sound and image processing.
Feature visualization is particularity useful tool in Edge Impulse web interface, as it allows users to get graphical insights into how the data looks after prepossessing. For example this is data after Flatten processing block:
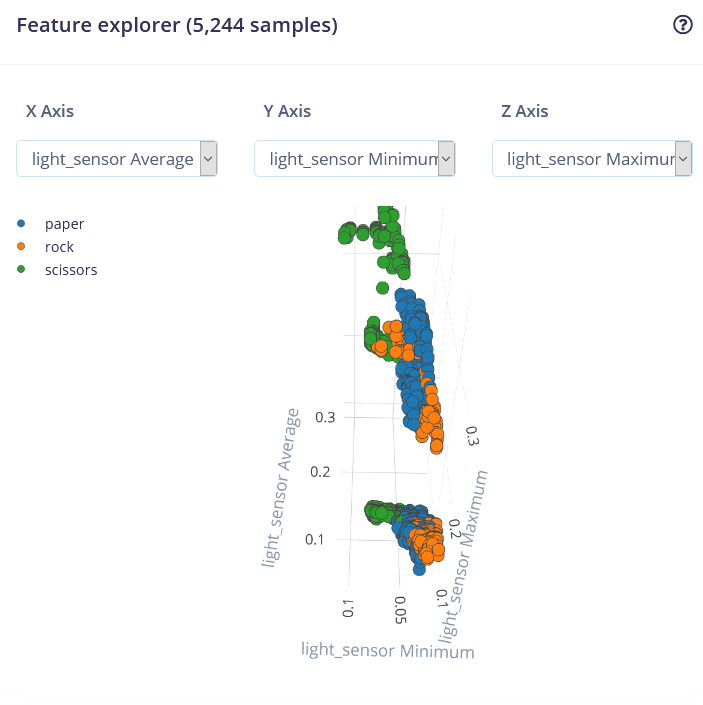
We can see that the data points for different classes are roughly divided, but there is a lot of overlap between rock and other classes.
After the training you can test the model using Live classification tab, which will gather a data sample from device and classify it with model hosted on Edge Impulse. We test with three different gestures and see the accuracy is satisfactory as far as proof of concept goes.
The next step is deployment on device. After clicking on Deployment tab, choose Arduino library and download it. Extract the archive and place it in your Arduino libraries folder. Open Arduino IDE and choose static buffer sketch, which already has all the boilerplate code for classification with your model in place. Neat!
#include <video_tinyml_inference.h>

float features[40];

/**
 * @brief      Copy raw feature data in out_ptr
 *             Function called by inference library
 *
 * @param[in]  offset   The offset
 * @param[in]  length   The length
 * @param      out_ptr  The out pointer
 *
 * @return     0
 */
int raw_feature_get_data(size_t offset, size_t length, float *out_ptr) {
    for (byte i = 0; i < 41; i = i + 1)
    {
    features[i]=analogRead(WIO_LIGHT);
    delay(25);
    }
    memcpy(out_ptr, features + offset, length * sizeof(float));
    return 0;
}


/**
 * @brief      Arduino setup function
 */
void setup()
{
    // put your setup code here, to run once:
    Serial.begin(115200);

    Serial.println("Edge Impulse Inferencing Demo");
}

/**
 * @brief      Arduino main function
 */
void loop()
{
    ei_printf("Edge Impulse standalone inferencing (Arduino)\n");

    if (sizeof(features) / sizeof(float) != EI_CLASSIFIER_DSP_INPUT_FRAME_SIZE) {
        ei_printf("The size of your 'features' array is not correct. Expected %lu items, but had %lu\n",
            EI_CLASSIFIER_DSP_INPUT_FRAME_SIZE, sizeof(features) / sizeof(float));
        delay(1000);
        return;
    }

    ei_impulse_result_t result = { 0 };

    // the features are stored into flash, and we don't want to load everything into RAM
    signal_t features_signal;
    features_signal.total_length = sizeof(features) / sizeof(features[0]);
    features_signal.get_data = &raw_feature_get_data;

    // invoke the impulse
    EI_IMPULSE_ERROR res = run_classifier(&features_signal, &result, false /* debug */);
    ei_printf("run_classifier returned: %d\n", res);

    if (res != 0) return;

    // print the predictions
    ei_printf("Predictions ");
    ei_printf("(DSP: %d ms., Classification: %d ms., Anomaly: %d ms.)",
        result.timing.dsp, result.timing.classification, result.timing.anomaly);
    ei_printf(": \n");
    ei_printf("[");
    for (size_t ix = 0; ix < EI_CLASSIFIER_LABEL_COUNT; ix++) {
        ei_printf("%.5f", result.classification[ix].value);
#if EI_CLASSIFIER_HAS_ANOMALY == 1
        ei_printf(", ");
#else
        if (ix != EI_CLASSIFIER_LABEL_COUNT - 1) {
            ei_printf(", ");
        }
#endif
    }
#if EI_CLASSIFIER_HAS_ANOMALY == 1
    ei_printf("%.3f", result.anomaly);
#endif
    ei_printf("]\n");

    // human-readable predictions
    for (size_t ix = 0; ix < EI_CLASSIFIER_LABEL_COUNT; ix++) {
        ei_printf("    %s: %.5f\n", result.classification[ix].label, result.classification[ix].value);
    }
#if EI_CLASSIFIER_HAS_ANOMALY == 1
    ei_printf("    anomaly score: %.3f\n", result.anomaly);
#endif

    delay(1000);
}

/**
 * @brief      Printf function uses vsnprintf and output using Arduino Serial
 *
 * @param[in]  format     Variable argument list
 */
void ei_printf(const char *format, ...) {
    static char print_buf[1024] = { 0 };

    va_list args;
    va_start(args, format);
    int r = vsnprintf(print_buf, sizeof(print_buf), format, args);
    va_end(args);

    if (r > 0) {
        Serial.write(print_buf);
    }
}
The only thing for use to fill in is the data acquisition on-device. We’ll use a simple for loop with delay to account for frequency (if you remember we had 100 ms delay when gathering data for training dataset).
    for (byte i = 0; i < 41; i = i + 1)
    {
    features[i]=analogRead(WIO_LIGHT);
    delay(25);
    }
Certainly there are better ways to implement this, for example a sensor data buffer , which would allow us to perform inference more often. But we’ll get to that in later articles of this series.
After you added sensor data acquisition part to sample code upload it to Wio Terminal and open Serial monitor. Move your hand while performing a gesture and see the probability results printed out on Serial monitor.
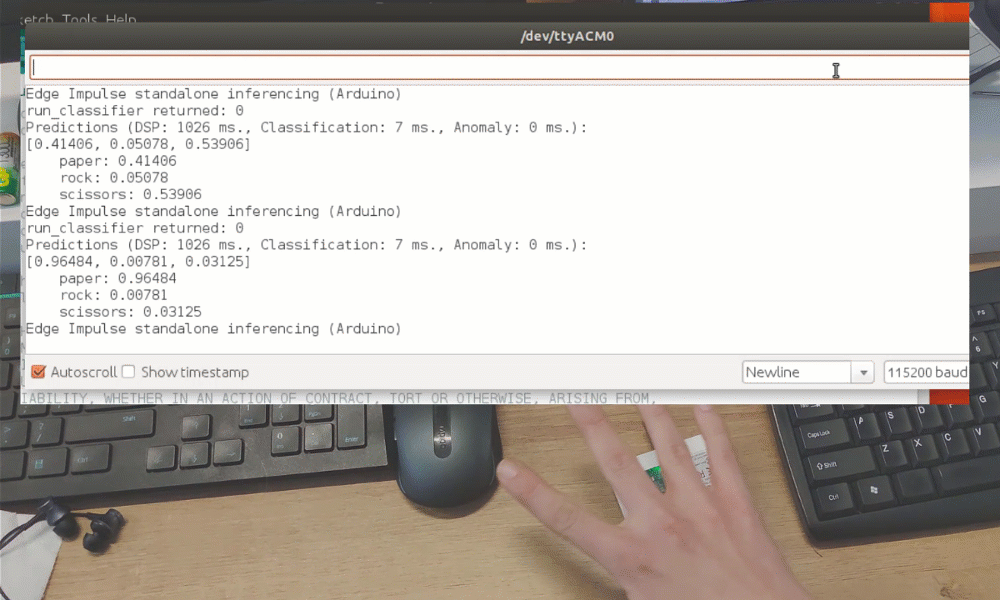
Mind blowing!

While it was just a proof of concept demonstration, it really shows TinyML is up to something big. As a person who does a lot of Computer vision projects, I knew it is possible to recognize gestures with a camera sensor, even if image is down-scaled a lot. What I didn’t know that it is possible to recognize gestures with just 1 pixel!
Tell us your ideas for cool TinyML projects in the comment section and stay tuned for more articles and videos in upcoming weeks!