28 Raspberry Pi Linux Commands: A Quick Guide to Use the Command Line for Raspberry Pi

Introduction
When you get your hands on a Raspberry Pi for the very first time, you need to install an operating system with a Micro-SD card connected to it. Raspberry Pi not only supports their official Raspberry Pi OS on the Raspberry Pi but also various other flavors of Linux distributions. So once you install an operating system on a Raspberry Pi, there are different ways of interacting with it.
- Connecting a display through the HDMI connector to experience a user interface
- Communicate through the serial interface
- Communicate via an SSH connection remotely
When you connect to a display, you are presented with a user interface and it is easy to navigate around the operating system just like your personal computers. But when you make a connection through serial interface or remote SSH, you don’t have a user interface as such. But instead, you will have to navigate around your Raspberry Pi via a command-line which is similar to the command prompt or PowerShell in a windows PC and terminal on a Macintosh.

Using a command-line you normally instruct the Raspberry Pi to perform tasks by entering commands via your keyboard, which is different from the traditional way of interaction, which is using a mouse. You might think that it is much easier to connect a display and use a user interface to interact with a Raspberry Pi, but however, once you get familiar with the command-line, your workflow is going to be much faster and also you will have more control over your Raspberry Pi. You will be able to combine these commands together into scripts and run them to complete tasks more efficiently. Also, there could be projects where you need to deploy your Raspberry Pi in a different location and in this situation, command line is going to be very useful.
This blog will help you get familiar with most of the useful commands that you will need in need to navigate through your Raspberry Pi and interact with it! Also, these commands will work with any Linux distribution on the Raspberry Pi and even any other systems running Linux!
Command-Line on the Raspberry Pi
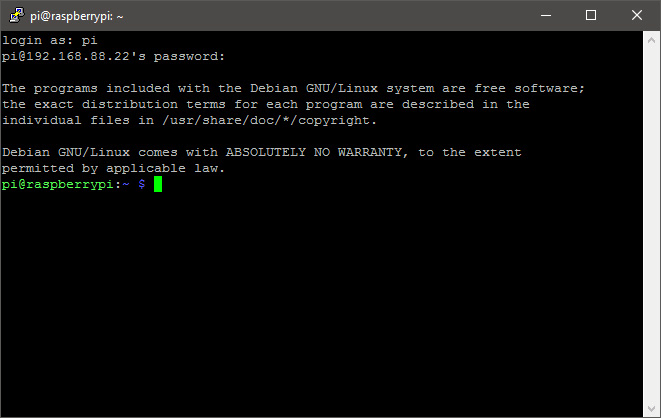
Once you log in to the command-line on your Raspberry Pi, the first line will start with the prompt pi@raspberrypi $. This indicates that you have successfully logged in to your Raspberry Pi. You can enter your commands in the commands line in front of this text.

Updating the system
Once you turn on your Raspberry Pi, it’s good practice to start off by updating your Raspberry Pi Operating System and it’s sources to the latest version. You can type the following commands to do so.
- sudo apt-get update
- sudo apt-get upgrade
- sudo apt-get dist-upgrade
- sudo rpi-update
These commands can be entered one by one or they can also be combined as follows
sudo apt-get update && sudo apt-get upgrade && sudo apt-get dist-upgrade && sudo rpi-update
Note: You enter “sudo” at the beginning to tell the Raspberry Pi that you are entering the commands as a “root” user. This allows you to enter all the commands that are available within Linux without any restrictions.
Navigating through files and folders
There are a few commands that you can use in order to navigate through your files and folders.
pwd : stands for print working directory and it shows you in which directory you are at
ls : it will list all contents of the directory you are at
ls -l : it will list all the contents of the directory you are at and show more details regarding the files
cd : it is used alone to come back to the root directory. However, if you use “cd” in combination with a name of another folder in the current directory, it will switch you to that directory.
Example: cd pifiles will switch you to a directory called “pifiles”.
cd.. : it is used to move back from one directory to another
Perform file and folder operations
There are commands that you can use to perform functions such as making new folders, copying/moving/deleting files, and folders.
mkdir: it will create a new directory
Example: mkdir pidir will create a new directory, where “pidir” is the label of the directory.
cp: this will help you to copy files from one directory to another
Example: cp /home/pi/new/file.txt /home/pi/project/ will copy the file.txt from /home/pi/new/ directory and paste in to /home/pi/project/ directory.
mv: this will act as a cut and paste command where the file will be moved from one directory to another. However, this command can be used to rename file names that are in the same directory.
Example: mv /home/pi/new/file.txt /home/pi/project/ will move the file.txt from /home/pi/new/ directory to /home/pi/project/ directory.
Example: mv oldproject.txt newproject.txt will change the file name from oldproject to newproject
rm: this will be useful to delete files that you no longer need anymore
Example: rm testfile.txt will delete the testfile.txt from its directory
clear: this will clear up all the commands in the current screen and display a clean new screen.
Creating a new file and editing the content
Once you create a file such as a text file, you might want to edit the contents inside this text file. For this, you might want to use a command-line text editor such as GNU Nano. By entering the command below you will be able to create a new file called newproject.txt or edit an existing file names newproject.txt and will be presented with a space to add content inside this file.
nano newproject.txt
You can create or edit other types of files in the same way by just changing the file format such as newproject.py for python files and newproject.conf for configuration files
Once you create the newproject.txt text file, you will be able to navigate around the document using arrow keys and type content inside the document. Once you are done Press Ctrl+x on your keyboard and then press Y when it asks you whether to save it.
Raspberry Pi hardware information
Sometimes you might want to check the hardware information on your Raspberry Pi and will be lost how to do so. Don’t worry. You can use the commands below to check all the hardware information.
cat /proc/cpuinfo : displays the processor information
cat /proc/meminfo : displays the Raspberry Pi memory informaton
cat /proc/partitions : displays the size and number of partitions on your SD card
cat /proc/version : displays which version of the Pi you are using
vcgencmd measure_temp : shows the CPU temperature and it is important to check this if you are running heavy applications and want to monitor the temperature
free -o -h : this will display the available system memory.
top d1 : This checks the CPU load and displays details for all cores.
df -h : this can be useful to check the amount of free disk space on your Raspberry Pi.
uptime : this displays the how long the Raspberry Pi was running and it’s load average.
Troubleshoot Raspberry Pi hardware
If you are looking for report on how the CPU and RAM on the Raspberry Pi are being taken up by the running processes, you can enter the following command
htop
This will be useful to check whether a particular app is running and also find out whether which apps are slowly down your Raspberry Pi. You can press ctrl+c to exit from this window.
Also, if you are having issues with your network, enter the following command to list about the networks that you are connected to.
ifconfig
If you are connected via Ethernet, check for eth0 section and if you are connected via Wi-Fi, check for wlan0 section. Also, you can have a look at your IP address.
Shutdown and restart your Raspberry Pi
There are a couple of commands that you can use to instantly shutdown or restart your Raspberry Pi
sudo shutdown -h now : This will immediately shut down your Raspberry Pi.
However, if you want a schedules shutdown in 2 hours for example, you should enter the command as follows sudo shutdown -02:00
sudo reboot : This will immediately restart your Raspberry Pi
Conclusion
We hope after following the above commands, you will get more comfortable using the command-line to interact with your Raspberry Pi.