What is NB-IoT and how to communicate with NB-IoT using Arduino?

Background
This article will discuss about NB-IoT, where it is used, what of applications it suits for, and how to communicate with NB-IoT using an Arduino. We hope this will enrich your knowledge about NB-IoT and eventually will lead to building your own NB-IoT based project!
What is IoT?
Before talking about NB-IoT, let’s understand what IoT is. IoT stands for Internet of Things and it can be regarded as a system of connected objects such as machines, electronic devices, etc. Each and every object can communicate with each other by sending and receiving data over a wireless network. This kind of communication can be also regarded as a machine-to-machine (M2M) communication and works intelligently and automatically.

In order to deploy an IoT solution, you need the following:
- Hardware (electronic device) that collects the data and process
- A wireless network to transmit the data which is collected
- PC with the necessary software to control the devices and analyze the obtained data
When talking about the network of transmission for IoT, there are different network protocols such as LoRaWAN, Sigfox, and NB-IoT. Let’s look at NB-IoT first and do some comparison later with LoRaWAN and SigFox.
What is NB-IoT?
NB-IoT stands for Narrow Band Internet of Things and it is a low-power wide-area (LPWA) technology that works anywhere. NB-IoT allows devices to perform wireless transmission over long distances at a much lower cost while consuming very low power for extended battery life. More importantly, it offers a secure and more reliable connection between the connected devices in the IoT. Also, It has been classified as a 5G technology, standardized by 3GPP in 2016.
What are the advantages of using NB-IoT?

NB-IoT offers various benefits such as:
Very low power consumption: Usually NB-IoT modules/devices can work up to 10 years with only a single battery. This is possible due to the amount of data transmission being small and therefore the energy drawn is less.
Cost Efficient: When using NB-IoT modules, due to their low power consumption, the power savings reflect mainly on the cost savings. Also, NB-IoT chips are simpler to create and available at a cheaper price.
Reliability: When NB-IoT is set up on a licensed spectrum, it offers improved reliability for users while guaranteeing resource allocation necessary to manage Quality of Service.
Wider Deployment: NB-IoT has lower bitrates and better ink budgets and also it doesn’t need gateways to provide the communication. Instead these devices can be directly connected to exciting base stations of existing LTE networks.
High Network Capacity: NB-IoT supports more than 100,000 connections per cell
High Mobility: NB-IoT can be deployed in areas where communication modules/devices are required to move between different locations.
Better Security: NB-IoT offers better security with two-way authentication and strong interface encryption.
Extended Long-Range Coverage: NB-IoT offers a long-range coverage with the ability to penetrate deeply in indoors and underground.
How does it differ from Sigfox and LR ?

There exist different IoT technologies with Sigfox and LR being widely deployed. Let’s have a comparison between these technologies.
| LoRa | Sigfox | NB-IoT | |
|---|---|---|---|
| Max. coupling loss | 160 dB | 157 dB | 164 dB |
| Technology | Proprietary | Proprietary | Open standard |
| Licensed radio spectrum | No | No | Yes |
Where NB-IoT can be used?
NB-IoT is suitable for various application scenarios such as:
- Smart Metering
- Smart Cities
- Smart Home and Buildings
- Health Care
- Agricultural and Environmental
- People and Animal Tracking
- Manufacturing and Logistics
How to enable NB-IoT communication on an Arduino?
Arduino is an open-source electronics platform based on easy-to-use hardware and software. It is an easy tool for fast prototyping, aimed at students without a background in electronics and programming.
Generally, we use an Arduino UNO Board for prototyping electronics projects, but this board doesn’t come with any wireless communication functionalities. Therefore, by adding different expansion boards/shields on top of the Arduino, we can extend the functionalities of the Arduino UNO.
Dragino NB-IoT Shield
This is an expansion board/shield that you can stack on top of an Arduino UNO to add NB-IoT technology. By using this shield, you can prototype NB-IoT solutions quickly and easily.

We offer this NB-IoT shield on our Seeed Bazaar and it comes in two versions:
So, when you choose yours, you have to make sure you select the shield with the frequency band that matches with your country.
Specifications
- Output Power: 23dBm
- Sensitivity : -129dBm
- Operation Temperature: -40°C ~ +85°C
- Input Vcc: 4.5v ~ 5.5v
- Micro SIM Interface
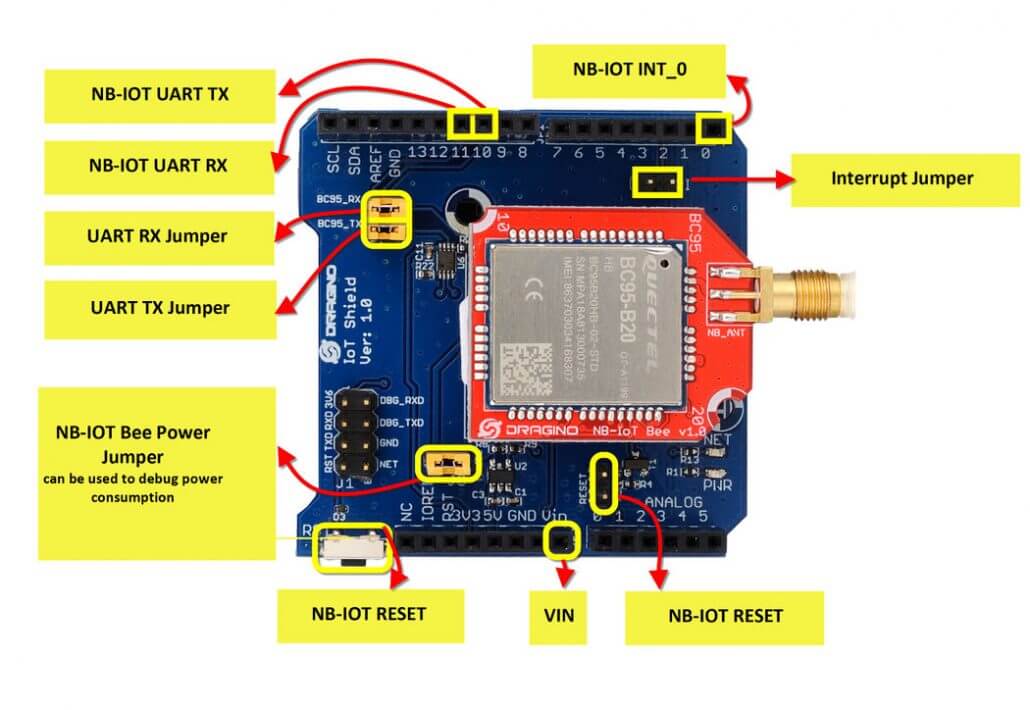
Hardware Overview
Example: Manually send AT Commands to control the NB-IoT Shield
Now let’s look at a simple example of using this shield with an Arduino. This example uses NB-IoT to communicate with a PC. User have to send an AT command through the PC to the NB-IoT module, and detect the strength of the signal.
Step 1
Connect the NB-IoT Shield with the Arduino UNO.

Step 2
Insert a Micro-SIM Card to the Micro-SIM interface on the NB-IoT Shield.

Step 3
Connect the Arduino UNO to the PC
Step 4
Open the Arduino software, and click “File–>New”, and save the new file

Step 5
Copy the following code in the Arduino IDE
#include <SoftwareSerial.h>
SoftwareSerial mySerial(10, 11);
void setup() {
  Serial.begin(9600);
  while (!Serial) {
  }
  Serial.println("Welcome to Dragino");
  mySerial.begin(9600);
}
void loop() {
  if (mySerial.available()) {
    Serial.write(mySerial.read());
  }
  if (Serial.available()) {
    mySerial.write(Serial.read());
  }
}
Step 6
Compile and upload the program
Step 7
Open Serial Monitor by clicking “Tools–>Serial Monitor”

Step 8
Wait for the string “Welcome to Dragino” and input the following commands
- input “AT”
- input “AT+CSQ”
- input “AT+CIMI”

Now you can explore more with this NB-IoT shield and build your own NB-IoT based sensor network using Arduino!
We hope you got a clear understanding about NB-IoT technology by reading this blog and hope you could start prototyping with Arduino by utilizing NB-IoT technology!