What is OpenMV Cam? The Arduino of Machine vision
Introducing the OpenMV Cam, a small, low-powered microcontroller board made for easy machine vision applications. Unlike Arduino or other microcontrollers, MicroPython OS is used instead of C/C+. This makes dealing with complex outputs of machine algorithms and working with high-level data structures simple!
It has two versions; the OpenMV Cam M7 (Older version) and OpenMV Cam H7. Here at Seeed, we provide both camera models, with the H7 now available for preorder!
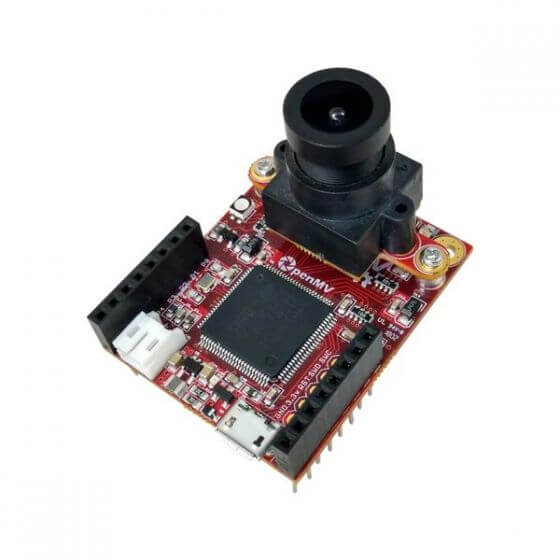
OpenMV H7 Camera Overview

By far the easiest way I’ve found to learn and use advanced computer vision. This single board can do everything from driving a car to landing a drone.
Chris Anderson (CEO of 3DR)
What are the features that allow the OpenMV Cam H7 to achieve such high regard? Let’s take a look!
Hardware Overview:
OpenMV H7 Cam Features:
STM32H743VI ARM Cortex M7 processor with wide range of I/O Interfaces:
- A full-speed USB (12Mbs) interface to your computer. Your OpenMV Cam will appear as a Virtual COM Port and a USB Flash Drive when plugged in
- A μSD Card socket capable of 100Mbs reads/writes which allows your OpenMV Cam to record video and easy pull machine vision assets off of the μSD card
- An SPI bus that can run up to 100Mbs allowing you to easily stream image data of the system to either the LCD Shield, the WiFi Shield, or another microcontroller
- An I2C Bus, CAN Bus, and an Asynchronous Serial Bus (TX/RX) for interfacing with other microcontrollers and sensors
- A 12-bit ADC and a 12-bit DAC.
- Three I/O pins for servo control
- Interrupts and PWM on all I/O pins (there are 10 I/O pins on the board)
- And, an RGB LED and two high power 850nm IR LEDs
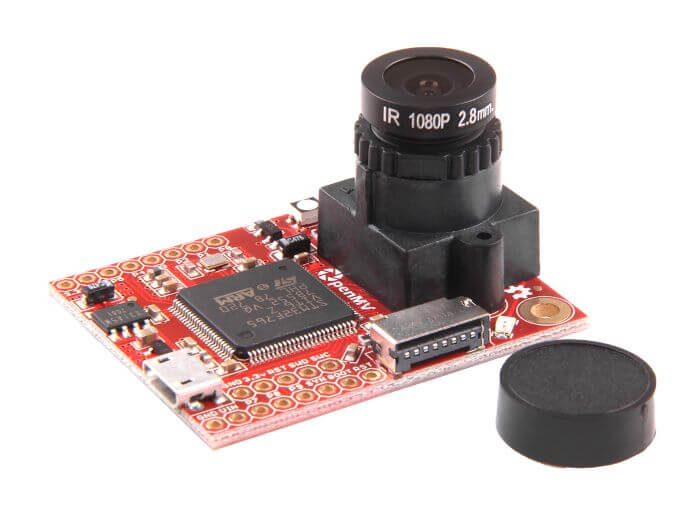
Removable camera module system, allowing for different sensor usages
- The OpenMV Cam H7 comes with an OV7725 image sensor, able to run at above 60 FPS. It’s a 2.8mm lens on a standard M12 lens mount.
- The removable lens allows you to easily buy and attach sensors that you would like to use!
Common battery usage
- A LiPo battery connector is compatible with 3.7V LiPo batteries commonly sold online for hobbyist robotics applications.
Diving deeper, the Specifications:
| Processor | ARM®32-bit Cortex®-M7 CPU w/ Double Precision FPU 480 MHz (1027 DMIPS) Core Mark Score: 2400 (compare w/ Raspberry Pi Zero: 2340) |
|---|---|
| RAM layout | Total RAM: 1MB Comprised of: 256B of .DATA/.BSS/Heap/Stack 512KB Frame Buffer/Stack 256KB DMA Buffers |
| Flash Layout | Total Flash: 2MB Comprised of: 128KB Bootloader 128KB Embedded Flash Drive 1729KB Firmware |
| Supported Image Formats | Grascale JPEG (and BAYER) RGB565 |
| Maximum Supported Resolutions | Grayscale: 640×480 and under RGB365: 320×240 and under Grayscale JPEG: 640×480 and under RGB565 JPEG: 640×480 and under |
| Lens Info | IR Cut Filter: 650nm (removable) Sensor used: OV7725 Focal Length: 2.8mm Aperture: F2.0 Format: 1/3″ HFOV = = 70.8°, VFOV = 55.6° Mount: M12*0.5 |
| Electrical Info | All pins are 5V tolerant with 3.3V output, and can be sinked or source up to 25mA. P6 is not 5V tolerant in ADC or DAC. Up to 120mA may be sinked and sourced in total between all pins. VIN may be between 3.6V and 5V. DO NOT draw more than 250mA from your OpenMV Cam’s 3.3V rail. |
| Dimensions | 45mm x 36mm x 30mm (L x W x H) |
| Weight | 19g |
Removable lens? Yes, you can swap the image sensor out!
If the onboard lens is not up to your expectations, the OpenMV H7 now features removable camera modules, allowing for Flir Lepton and Global Shutter sensor usages!
Power Consumption:
| Idle – No μSD Card | 110mA @ 3.3V |
|---|---|
| Idle – μSD Card | 110mA @ 3.3V |
| Active – No μSD Card | 160mA @ 3.3V |
| Active – μSD Card | 170Ma @ 3.3V |
Temperature Range
| Storage | -40°C to 125°C |
|---|---|
| Operating | -20°C to 70°C |
Pinout

Software Overview:
OpenMV IDE

OpenMV IDE allows for easy programming with your OpenMV Cam through Python. Coding in Python makes working with machine vision algorithms much easier!
- Treat it like an Arduino IDE made for machine vision algorithms!
More on OpenMV IDE:
- OpenMV IDE is a development environment that features a powerful text editor, debug terminal, and frame buffer viewer w/a histogram display. Built and design for OpenMV Cameras!
- Compatible with Windows, OSX Snow Leopard, Ubuntu 12.04, Raspberry Pi
To download the latest version of OpenMV IDE, you can head here!
- Head here for more information on the OpenMV IDE and its tutorial
OpenMV H7 Cam Key Applications, What can it do?
Here are all the key applications for OpenMV cam, alongside video tutorials for more technical applications to help you get started!
Security applications through Frame Differencing
Used to detect motion in a scene by looking at what’s changed. Making it applicable for security applications on the OpenMV Cam!
Color Tracking
Detect up to 16 colors at a time with the OpenMV Cam! Each color can have any number of distinct blobs, telling you the position, size, centroid, and orientation of each blob afterward.
Color tracking can be programmed, enabling way more applications!
Marker Tracking
OpenMV Cam can be used to detect groups of colors, allowing you to create color markers to be placed on objects. Tagged objects can then be understood through your OpenMV Cam.
Face Detection
Faces or any generic object can be detected with the OpenMV Cam. It does so with Haar Cascades and built-in Frontal Face Cascade/Eye Haar Cascade.
Eye Tracking
Want to detect someone’s gaze? The OpenMV Cam is capable of detecting that and using it to control a robot for example!
Optical Flow
Optical Flow is used to detect translation of what your OpenMV Cam is looking at. You can use it on a quad-copter to determine how stable it is in the air as an example!
QR Code Detection/Decoding
Reading QR code is possible on the OpenMV Cam. This allows for smart robot projects!
AprilTag Tracking
What’s better than QR code is AprilTag tracking!
AprilTags are rotation, scale, shear, and lighting invariant state-of-the-art fiducial markers. The OpenMV Cam H7 allows for 160×120 at up to about 12FPS.
Edge/Line Detection
OpenMV Cam can be used to easily detect the orientation of objects through edge detection. This can be done via either the Canny Edge Detector algorithm or simple high-pass filtering followed by thresholding.
Template Matching
Template matching can be used with the OpenMV Cam to detect when a translated pre-saved image is in view. It can be used to find fiducials on a PCB or read known digits on a display
Image Capture
The OpenMV Cam can be used to capture BMP/JPG/PPM/PGM images. You have direct control over how images are captured in your Python script. What’s even better is that you can perform machine vision functions and/or draw on frames before saving them!
Video Recording
What’s a camera without video recording capabilities right? With the OpenMV cam, you can record MJPIEG video or GIF images. Similarly to image capturing, you have direct control in your Python script. Machine vision functions and/or draw on frames before saving can be done as well!
TensorFlow Lite for Microcontrollers Support
TensorFlow Lite support allows for custom image classification and segmentation models onboard your OpenMV Cam. With the TensorFlow Lite, you can easily classify complex regions of interest in view and control I/O pins based on what you see!
To summarise, here’s the full list of applications, with its respective video demos (for those not covered above):
- Frame Differencing
- Color Tracking
- Marker Tracking
- Face Detection
- Eye Tracking
- Person Detection
- Optical Flow
- QR Code Detection/Decoding
- Data Matrix Detection/Decoding
- Linear Barcode Decoding
- AprilTage Tracking
- Line Detection
- Circle Detection
- Rectangle Detection
- Template Matching
- Image Capture
- Video Recording
- TensorFlow Lite for Microcontrollers Support
But wait, there’s more!
These applications are what’s currently possible on the OpenMV H7 Cam. However, as update rolls on, there’ll be more you can play with in the future!
OpenMV H7 vs Open M7

The OpenMV H7 is an upgraded version of the M7, with major improvements in the following areas:
- Higher processing frequency
- Higher RAM
- Now support BAYER imaging format
- OV7725 Sensor that’s removable, with support for FLIR Lepton and Global Shutter
- Way more applications; Data Matrix Detection, Linear Barcode Decoding, Rectangle, Circle detection, etc.
What’s even better, they are both priced the same!
OpenMV Cam Tutorial
To help you get started on the OpenMV Cam, here’s a quick tutorial!
Note: This tutorial can be used for both the OpenMV Cam M7 and OpenMV Cam H7. Before we get started, ensure you’re connected to the internet as well!
Step 1: Download OpenMV IDE for your operating system. When installing, accept all default options.
Step 2: Open the OpenMV IDE and connect M7/H7 to your computer. On the IDE, click the “Connect” button in the bottom-left corner to establish a connection with your OpenMV camera.
Step 3: Update firmware if needed. A pop-up asking you to update your device firmware will appear if it’s out of date.
- You should see that the reported firmware has been updated to the recent version once the flashing process is completed. (a [latest] text should appear)
Step 4: Start testing. When you first open the OpenMV IDE, there should be some example code that appeared. Click the Play button located at the bottom left and you should see a live video playing from the camera!
You can find the in-depth tutorial for various devices and all about the OpenMV IDE here!
Resources and Going Further
Want to dive deeper into what the OpenMV H7 is all about? You can refer to the following resources:
- OpenMV Cam H7 Datasheet (.pdf)
- OpenMV Cam Base Schematic (.pdf)
- OpenMV Cam OV7725 Schematic (.pdf)
- Processor Datasheet: STM32H743VI (.pdf)
- Camera Datasheet: OV7725 (.pdf)
- Regulator Datasheet: PAM2305AAB330 (.pdf)
Summary
Started off as a Kickstarter project, the OpenMV Cam is slowly making its mark in the market and deservingly so! It makes machine vision easy, suitable for makers and hobbyists to explore their creativity without having to worry!
Own an Arduino or not, it’s one not to miss for your next Machine vision project, grab an OpenMV H7 Camera today!