Getting started with micro:bit: MakeCode, Accessories, Projects!
What is micro:bit? Introduction

The BBC micro:bit is a pocketable computer, ideal for kids and beginners to experience coding with MakeCode, showcase their creativity and innovation. It can be used for all sorts of cool creations, from robots, to musical instruments making Micro:bit the one for endless possibilities!
In today’s blog, I’ll help you get started with the BBC micro:bit by providing a Makecode micro:bit guide, what to pair with the micro:bit with, and some projects you can start trying!
Micro:bit Key Features:
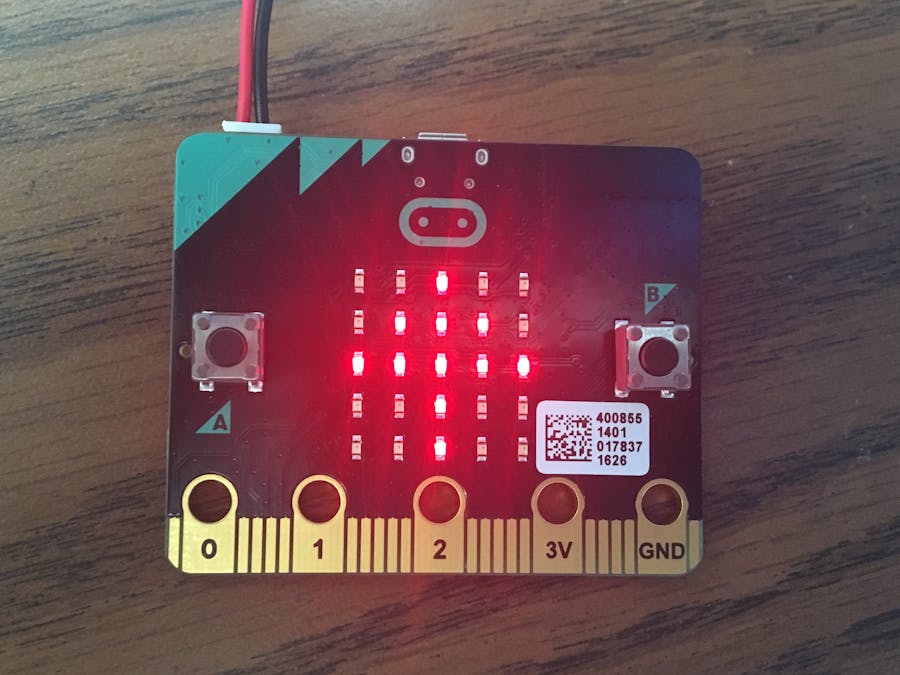
The BBC micro:bit has an awful lot of features, prominently:
- 25 red LED lights flashing messages
- Two programmable buttons used to control games/pause and skip songs on a playlist
- Low energy Bluetooth connection that interacts with other devices and the Internet
- Embedded compass, accelerometer, mobile, and well-based programming capabilities
And many other more!
Want to quickly understand what the micro:bit is all about? Watch the following video!
A little on Microbit History:
Wondered about how micro:bit came about?
Microbit dates back in 2015, mainly being BBC’s plan to introduce and inspire a million UK students to code, create, and get started down the path of programming hardware.
Fun Fact!
Do you know the micro:bit wasn’t the first that’s introduced, but this instead!

Dating back to the 1980s, this was the first BBC micro introduced to many students in UK!
Micro:bit Hardware Overview
Front Side

| micro:bit hardware overview: front side | |
|---|---|
| LED Array | Found in the centre of the micro:bit is a 5×5 LED array It’s used as a tiny screen to draw on, display words, numbers, and other information It functions as a light sensor as well! |
| A/B Buttons | Found on the sides of the micro:bit are the A/B Buttons Clicky buttons with A on the left, and B on the right. They are both for controlling a game of your design. |
| Edge “Pins” | Found at the bottom of the micro:bit are tabs for external components The tabs with larger holes can be used with alligator clips for quick prototyping |
What goes on at the back?
On the back of the micro:bit is what makes it such a powerful device in a small package. Here’s what goes into it!

| micro:bit hardware overview: the back | |
|---|---|
| Microcontroller | The micro:bit is powered by a 16MHz ARM Cortex-M0 microcontroller with 256KB Flash and 16KB RAM |
| Accelerometer/Compass | Onboard accelerometer that measures gravitational force Onboard compass that detect its orientation using Earth’s magnetic field This version of the micro:bit showcases it on seperate ICs |
| Bluetooth | Integrated BLE with standard “radio” This is the component that makes communicating micro:bit with your phone/tablet easy |
| Temperature Sensor | Temperature sensing is done with the microcontroller Yes, the microcontroller acts as a temperature sensor as well! |
| USB Port | Located at the top is your USB port Used to upload code to your micro:bit or powering it via your computer/laptop |
| Reset Button | Next to the USB port is your reset button It resets your micro:bit and your code over from the beginning |
| JST Battery Connector | To the right of the reset button is your JST Battery Connector It hooks up to an external battery pack to your micro:bit |
How to use Makecode micro:bit
Get started on the micro:bit Makecode in 5 steps, as simple as that! You’ll only need the following:
- micro:bit
- micro USB cable
- Makecode
- Makecode is an open programming environment built by Microsoft, made for micro:bit and other boards.
Step 1: Connect your micro:bit with your laptop/computer with the micro USB cable

It’ll show up on your computer as a drive called “MICROBIT”. Don’t be surprised if you don’t see it as a normal USB disk!
Step 2: Launch MakeCode micro:bit and select programming base
Once launched, its basic layout will be shown as to below:

On the header of this page, you will find that you can choose between Blocks or Javascript option. Not to worry if you’re new to programming as they each will populate the other and can be easily switched back and forth.
Step 3: Downloading “hex” file to your PC
Click the download button in the editor. It’ll initiate a download of an “hex” file, a compact format of your program that your micro:bit can read.
Once it’s downloaded, copy it to your micro:bit like how you would normally copy a file to a USB drive

Step 4: Await for the code to finish running
While the code is programmed, the micro:bit will pause, with yellow LED on the back blinking. Once it’s finished, the code will run automatically!
Step 5: Start Building!
With that, you can start trying out some ideas! Stay tuned, as I’ll be sharing some project ideas later on!
Not using a Windows Laptop/PC? Not to worry!
Apart from your traditional Windows Laptop/PC, you can program the micro:bit on macOS, Linux with the Raspberry Pi and mobile as well! For the quick overview of how that’s possible, you can head here!
Micro:bit Accessories
The BBC micro:bit is compatible with a wide range of accessories, each enabling it for a wider range of applications. Here are my recommendations!
1) Pairing micro:bit with Grove system
Grove System? It’s Seeed very own system that allows for plug-n-play with hundreds of different Grove one modules that include:
- Sensors
- Actuators
- Communication modules
- Displays
You can easily pair and remove with Grove cables instead of messy and complicated jumper wires!
For the full list of grove modules compatible with micro:bit, you can head to our wiki page
What you need: BitMaker / BitMaker Lite

This is the BitMaker, the bridge for micro:bit and Grove system. It’s essentially a credit-sized extension board that’s designed to help you easily integrate your micro:bit to our system. It’s currently available for preorder, with availability slated for Dec 11th 2019!
Its Features:
- Plug and play
- Built-in 4 addressable RGB LED and speaker for playing melody
- Up to 6 Grove ports (of which 1 I2C port)
- Overcurrent protection (rated at 1.5A)
- Reserves all touchable pins from micro:bit
- Fully support Microsoft Makecode and microPython
Can’t wait to test our Grove system with the micro:bit? Consider BitMaker Lite; a smaller, cheaper, and more compact version that’s in stock now!
Wonder how easy it is to pair it with your micro:bit? It only requires the following 4 steps!
Step 1: Click the gear icon (for settings) on the blue bar in MakeCode
Step 2: Select “Extensions” from the drop-down list which takes you to the extensions page
Step 3: If you want to add BitMaker extensions, input this URL into the search box:
Step 4: Click on the extension package to go back to the workspace. You will see that the BitMaker extension is successfully added.
Note: After you download the program to micro:bit, make sure the BitMaker is connected to power through a micro USB cable.
2) Pairing micro:bit with BitWear

Want to make fun wearable gadgets with your micro:bit? Look no further, BitWear is a low-cost compact accessory that does just that!
Its Features:
- Compact design for micro:bit-based wearable projects
- Built-in speaker for playing melody, vibration motor and addressable RGB LED
- Easy to assemble
- Powered with one or two CR2032 batteries
- ON/OFF Power switch with LED indicator
- Fully support Microsoft Makecode and microPython
BitWear allows you to turn off the motor and pixels with switches as well, not affecting the touch pins on your micro:bit!
Interested? You can learn more about the BitWear and its pairing with micro:bit here!
3) Pairing micro:bit with BitCar

Looking for something that’s easy to assemble, easy to code, and most importantly fun to play with? Check this Bitcar out!
BitCar is a do-it-yourself robot that uses high-quality metal gear motors to drive the wheels, allowing it to have a longer lifespan than normal plastic gear motors!
Its Features:
- Highly reliable metal-gear motors
- 2 way line follow
- Obstacle avoiding with ultrasonic sensor add-on
- Built-in speaker for playing melody or providing sound effect
- 4 addressable RGB LEDs
- 2 Grove ports for extensions
- Powered with 3 AAA batteries
- Fully support Microsoft Makecode and microPython
Interested? You can learn more about the BitCar and its pairing with micro:bit here!
Pi Supply Bit:Buggy Car (without micro:bit)

Need another car-based accessory for your micro:bit? This one is for you!
The Pi Supply Bit:Buggy Car is a small DIY smart car of a micro:bit project, where the basic version is capable of light following, remote control, and other functions!
- However, with the 3 extended GPIO ports, you can add different sensors and modules to extend its functionality; including obstacle avoidance, drawing, and much more!
Its Features:
- 2 x Servo
- 1 x Screwdriver
- 2 x Wheel
- 2 x Rivet
- 1 x Universal Wheel
- 1 x Back Shield
- 1 x Bit:Buggy Board
- 6 x Tapping Screw
- 2 x Side Board
- 1 x Binding Post
- 5 x Screw
- 1 x Rubber Band
- 1 x Special Expansion Board
- 1 x Base Board
- 1 x Front Shield
- 2 x Side Board
Micro:bit Kits
Need a kit that helps you get started with micro:bit pairings? Explore the fun world of micro:bit projects and what you can achieve with these two kits!
BitStarter Kit: The beginners choice

Remember Grove and how simple it pairs with your micro:bit? With 100 over modules to choose from, it may be tough picking out what you need. Simplify the selection process with this BitStarter Kit!
What’s in the Kit?
- 1x BitMaker Lite
- 1x Analog Servo (180°)
- 1x Ultrasonic Sensor
- 2x Grove Cable
- 1x Slider
- 1x 500mm USB Cable
- 1x Projects Guide
What’s even better is that it supports up to 10 project usages, Microsoft Makecode and microPython!
Pi Supply micro:bit Starter Kit (without micro:bit)

Another starter kit that’ll be shortly releasing at Seeed is our Pi Supply micro:bit Starter Kit! If you’re looking to enter into the world or electronics, programming, and physical computing, this kit is for you!
With basic parts such as LEDs, buttons, buzzer, temperature sensor, servo, and motor included, you can use it to design circuits, and even animate it with your MakeCode skills!
If you’re unsure on what to build with this kit, not to worry as it comes with 13 projects for you to choose from! Including:
- Make 2 LEDs blink in a pattern
- Display data on the BBC micro:bit’s LED panel
- Use a switch to start/stop a motor
- and many more!
For the plethora of parts included in this list, do check out our product page for more!
BitGadget Kit: More modules for a wider variety of micro:bit applications

Looking to build fun and cool micro:bit projects that shine, move and make sound? This BitGadget Kit allows for all of that in a single package!
What’s in the kit?
- 1x BitMaker
- 1x Light Sensor
- 1x Sound Sensor
- 1x Button
- 1x Analog Servo (180°)
- 1x Ultrasonic Sensor
- 1x Mini Fan (with motor)
- 1x Vibration Motor
- 7x Grove Cable
- 1x 500mm USB Cable
- 1x ProjectsGuide
What’s different when compared to the BitStarter Kit:
- Wider variety of modules; 7 different Grove modules instead of 3
- BitMaker instead of Bitmaker Lite
Pi Supply micro:bit Tinker Kit (without micro:bit)

With a wide variety of modules available for micro:bit, connecting them together may be a hassle. However, with this Pi Supply micro:bit Tinker kit, it no longer is!
This micro:bit tinker kit comes with ten different modules that you can connect together to easily help you learn about coding and physical computing!
The modules that it comes with include:
- 1 x Crystal Battery Box – 2 x AAA
- 1 x Micro:bit Breakout Board
- 1 x Micro-B USB Cable
- 1 x OLED Display
- 1 x Mini Servo
- 1 x Octopus PIR sensor Brick
- 1 x Octopus Soil Moisture Sensor Brick
- 1 x Octopus ADKeypad
- 1 x Octopus Crash Sensor Brick
- 1 x Octopus Passive buzzer Brick OBPB01
- 1 x Octopus 5mm LED Brick OBLED – Red
- 1 x Octopus 5mm LED Brick – Green
- 1 x Octopus 5mm LED Brick OBLED – Blue
- 1 x Octopus Analog Rotation Brick OBARot
Micro:bit projects
You’ll be in awe of the amount of micro:bit users and project ideas shared online. You can simply find hundreds of projects to help inspire your next idea!
Here are some micro:bit project ideas to try!
For a comprehensive list, you can check out our recent Top 25 Micro:bit projects for you to try in 2019!
1) micro:bit + Spotify

For all you music lovers out there, this project is for you! It allows you to experience playlist controlling in a different way; through a micro:bit!
What do you need?
Hardware components:
Software apps and online services:
- Microsoft MakeCode
- Spotify
Interested? You can check out the full tutorial by Sam El-Husseini on hackster.io!
2) micro:bit board game
This board game uses micro:bit as a modern type of dice that interacts with a handmade legend. Since it’s handmade, you have the freedom in making adjustments!
What do you need?
Hardware components:
Software:
- Microsoft MakeCode
Interested? You can check out the full tutorial by Lauryn Techino on hackster.io!
3) Bikeyface Emoji Taillight
Are you a bike rider and looking for a taillight that’s unique and customizable? This project is for you!
What do you need?
Hardware components:
- 2 BBC micro:bit board
- 2 USB-A to Micro-USB Cable
- 5V USB power supply
Hand tools and fabrication machines:
- 3D printer
Interested? You can check out the full tutorial by Alex Glow on hackster.io!
Resources and Going Further
Here are some additional resources for you to check out!
Official pages of micro:bit
- More information about micro:bit
- Hardware guide with technical and compliance information
- Quickstart Guide with additional information from the micro:bit foundation
- Project Ideas, lessons, tutorials from micro:bit
- Projects that you can start building with your micro:bit
- Micro:bit makecode to start coding on your micro:bit, includes information of other suitable programmign environments as well!
- Educational resources aimed at educators, alongside classroom based micro:bit activities
More on what’s covered today
- Micro:bit related products ranging from micro:bit cases, accessories, kits and more!
- Micro:bit telec version product page