LTE Cat 1 Raspberry Pi Hat: Build faster IoT applications
Need a Cellular Raspberry Pi Hat that allows for faster building of IoT applications? The LTE Cat 1 Pi Hat is exactly the thing for you!

Did you say Raspberry Pi and Cat 1 functioning as a combo?
Yes, it’s as good as it sounds! This Raspberry Pi Hat incorporates LTE Cat 1 category that’s based on the u-blox LARA-R2xx series. It includes UART and USB interfaces for easy communication with your Raspberry Pi as well.
Diving further into the LTE Cat 1 Pi Hat

To further understand what the Seeed’s LTE cat.1 Pi HAT offers, we’ll take a deeper look into its key features and applications.
It is an open-source cellular extension modem for your Raspberry Pi, based on u-blox LARA-R2xx series. Designed for LTE Cat 1 networks with 2G fallback (EU version only)
Key Features:
- Compatible with Raspberry Pi 1 Model B+ and later versions
- LTE CAT.1 and support 2G fullback (EU only)
- UART and USB interface for communication
- Support Grove I2C and Digital Connector
- Protocols on cellular module
- Embed TCP/UDP stack
- Embed HTTP, FTP, SSL
- Dual Stack IPV4/IPV6
- 3GPP TS 27.007 [8], TS 27.005 [9] standard AT command
Its features make it a solid pickup choice, here’s why:
Ease of pairing with Raspberry Pi
The support for UART and USB interfaces allow for ease of communication with the Raspberry Pi.
Quick and easy to start prototyping
Through UART, not only is it easy to pair but with AT command, the LTE Cat.1 Pi Hat does so without any special driver!
Wider and Quicker IoT applications
LTE Cat 1 allows for speeds of 10Mb/s downlink and 5Mb/s uplink, opening up possibilities of running a wider range of feature-rich M2M and IoT applications, including those that require video streaming and voice support.
Cost-effective
The usage of LTE Cat 1 instead of Cat 4 or greater allows for lower power consumption and complexity, allowing it to be cost-effective!
Compatible with many Raspberry Pi Models
Compatible with Raspberry Pi 1 Model B+ onwards, you no longer have to worry about buying a HAT that isn’t suitable with your Raspberry Pi version!
Grove Compatible
Been using jumper wires alongside your raspberry pi? You would no longer need to with LTE CAT 1 Pi HAT!
The support for Grove I2C allows for plug-n-play using grove cables instead of messy and complicated jumper wires!
- Find out more about the grove system and its cables
Wide range of applications
LTE Cat 1 can be applied in many scenarios, with its key applications being:

There are many other possible applications you can try out as well:
- IoT gateway
- Data logger
- Vending machine
- POS
- Smart home devices
- Robot
- Advertising
- Other scenarios that require cellular networks
Sounds too good to be true? Here’s what goes into the LTE Cat 1 Pi HAT that makes it possible
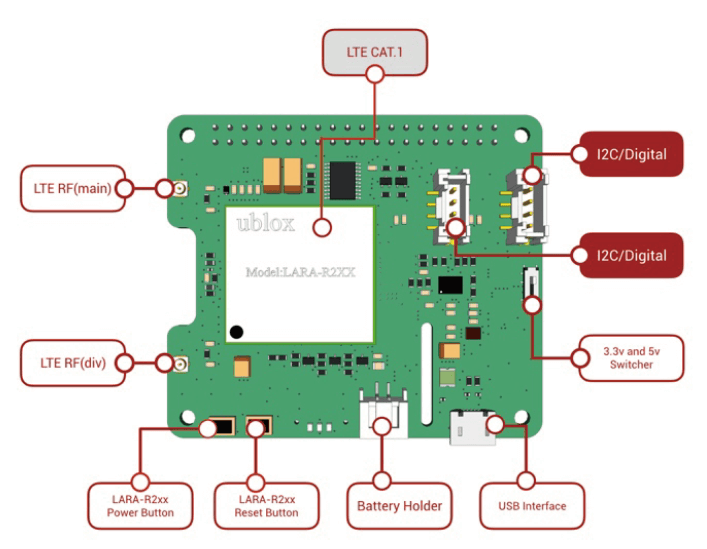
| Interfaces | Usage purposes |
|---|---|
| LTE CAT.1 | U-blox Lara-R2xx series LTE CAT.1 module |
| Grove Port | 2 Grove I2C/Digital Port, connected to SDA_RPI, SCL_RPI, it can be used as I2C or GPIO port |
| Switcher | Control Grove port voltage as 5V or 3.3V |
| USB Interface | Can be used to power up the LTE Cat.1 and raspberry together The debug port can be used as well |
| Battery Holder | MP2617 is used for batter power management If the battery is not connected, the CHG led will flash by 6HZ frequency It wil be off when under charging and on when finish charging. The connecter is JST2.0 standard |
| Lara-R2XX Reset Button | Resets Lara-R2xx module |
| Lara-R2XX Power on button | Press 2 seconds to power on the Lara-R2xx module |
| Antenna | It includes 2 antennas, one is main and other is div. The main antenna is used for both sending and receiving signals. It must be connected. The div antenna is optional, only used for receiving purposes and to improve receiver sensitivity |
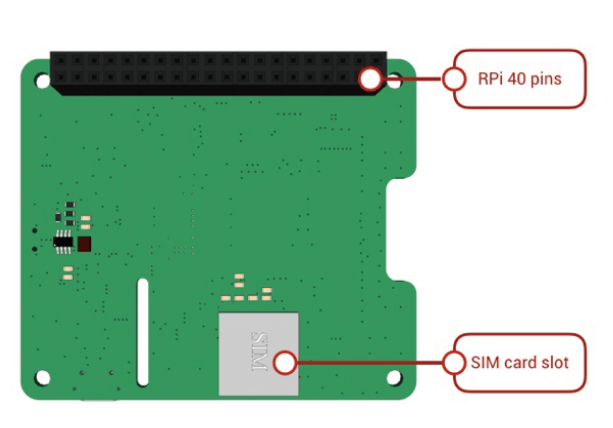
| RPI 40 Pins | Refer to pinout |
| SIM card slot | Follow silk screen direction to plug LTE SIM card |
Quick Notes before buying an LTE Hat
Before touching on how you can get started with the LTE CAT 1 Pi HAT, do check which network provider, region, etc. you’re on.
To ensure most gets to try the LTE CAT 1 Pi Hat, we carry three versions here at Seeed, each supporting different networks.
Getting Started with the LTE Cat 1 Pi Hat
Once you’ve figured out which the version and you like what you’ve seen so far, here’s how you can get started with the LTE Cat 1 HAT:
NOTE: This demo uses the Raspberry Pi 3 with 2018-04-18 Raspbian Stretch With Desktop though the LTE Cat 1 HAT is still compatible with the latest Pi 4
Hardware setup:
Step 1: Stack LTE Cat 1 Pi HAT on top of the Raspberry and connect the 2 antennas (included)

Step 2: Connect the mouse, keyboard, and monitor as well
Step 3: Power the Raspberry Pi
Software Configurations:
- Step 1: Use dtoverlay=pi3=disable-bt to enable Raspberry Pi3/Pi4 UART0
sudo nano /boot/config.txtThen add dtoverlay=pi3-disable-bt and enable_uart=1 to bottom of the config.txt. it should look like this.
[all]
#dtoverlay=vc4-fkms-v3d
dtoverlay=pi3-disable-bt
enable_uart=1- Step 2: Disable the system service to use the UART0
sudo systemctl disable hciuart Note: Pi3-disable-bt disables the Bluetooth device and restores UART0/ttyAMA0 to GPIOs 14 and 15. It’s also necessary to disable the system service that initialises the modem so it doesn’t use the UART: sudo systemctl disable hciuart
- Step 3: Delete the console=serial0, 115200 in cmdline.txt.
sudo nano /boot/cmdline.txtThen delete console=serial0, 115200 from the string.
- Step 4: Reboot the Raspberry Pi
sudo reboot- Step 5: Run below commands to run the demo
cd ~
git clone https://github.com/Seeed-Studio/ublox_lara_r2_pi_hat.git
cd ublox_lara_r2_pi_hat
sudo python setup.py install
cd test
sudo python test01.py- Step 6: Output from the terminal is shown below
pi@raspberrypi:~/Desktop/ublox_lara_r2_pi_hat/examples $ sudo python test01.py
40-pin GPIO header detected
Enabling CTS0 and RTS0 on GPIOs 16 and 17
rts cts on
waking up...
module name:  LARA-R211
RSSI:  3
Project ideas:
Wonder what you can build with the LTE Cat 1 Pi HAT? Here’s a simple project idea you can consider!
Face Recognition Smart Lock
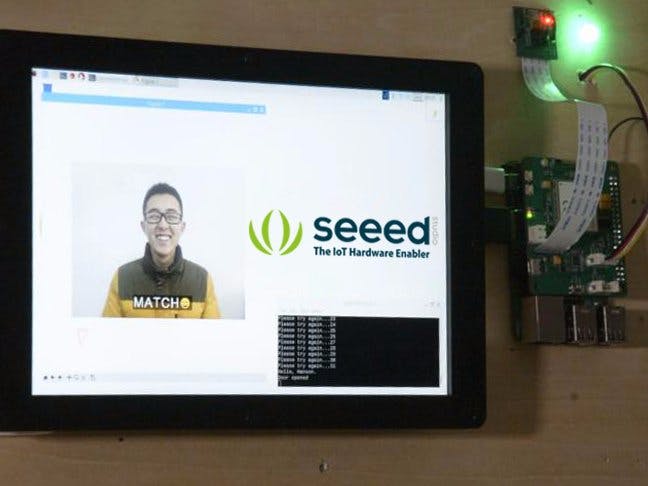
With face recognition being such a widely adopted smart lock system, this project is a good way to build yourself one!
Hardware components needed:
- Raspberry Pi 3 Model B
- Raspberry Pi Camera Module
- Seeed Grove – Relay
- Seeed LTE Cat 1 Pi HAT
- Seeed 10.1 inch 1200×1980 HDMI IPS LCD Display
Software apps and online services:
Interested? You can check out the full tutorial on Seeed Project Hub!
Resources and Going Further
Here are the relevant resources:
- [PDF] LTE Cat.1 Pi HAT Schematic
- [PDF] u-blox-CEL_ATCommands
- [PDF] LARA-R2_DataSheet
- [PDF] LARA-R2_SysIntegrManual
- [PDF] AT-Commands Examples AppNote
Summary
Overall, the LTE CAT 1 Pi HAT is an excellent choice to further your IoT experience on the Raspberry Pi. It enables you to do way more than what it seems. Pick one up today!
For more technical information, please check out our Wiki. This board is also able to be customized, feel free to contact us at iot@seeed.cc for any inquiries.