Arduino Accelerometers: ADXL356, ADXL345 vs ADXL335
Mems accelerometers are simple, portable, and applicable but how do we get started? Which accelerometer is the most suitable for your next Arduino project? In this blog, I’ll get you started with a 3-axis accelerometer: ADXL356. A comparison; ADXL345 vs ADXL335 will be covered too!
Here at Seeed, we offer a wide range of 3-axis accelerometers to connect with Arduino boards, however, if you’re wondering how to pick a suitable one or looking for a buying guide, you can check out my article on it
ADXL356
The ADXL356 is an industrial grade, high stability, precision, and low powered ADI ADXL series three-axis accelerometer.
The analog output ADXL356 is a low noise density, low 0 g offset drift, low power 3-axis accelerometer with selectable measurement ranges. The ADXL356 offers industry-leading noise, minimal offset drift over temperature, and long-term stability, enabling precision applications with minimal calibration.
The ADXL356 offers two versions:
- ADXL356B that supports ±10 g and ±20g range
- ADXL356C that supports ±10g and ±40g range
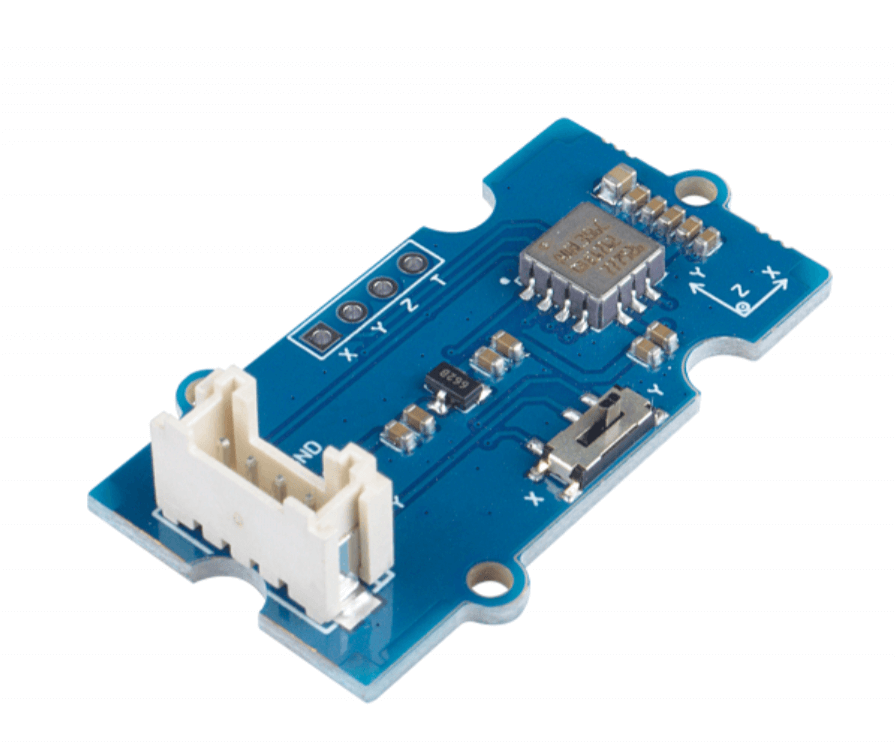
The above accelerometer sensor that you see is the Grove – 3-Axis Analog Accelerometer ±40g that runs on an ADXL356C version. Its industrial-grade technology allows for a relatively accurate result with little calibration work to be done.
The integration of ADXL356C does bring performance advantages on the Grove-3-Axis Analog Accelerometer. Here’s why it’s great:
Industry-leading technology
Precisions applications with minimal calibration can be achieved with its Industry-leading noise, minimal offset drift over temperature, and long-term stability
Long-term temperature stability
Its hermetic package offers excellent long-term stability 0g offset vs. temperature (all axes): 0.75mg/
°C maximum
Ideal for wireless condition monitoring
The low noise of the ADXL356 over higher frequencies make it ideal for wireless condition monitoring
Ultra-low power consumption
Normal operation mode – 150 μA, with Standby mode being only 21 μA
What makes the Grove- 3-Axis Analog Accelerometer ±40g (ADXL356C) special?
The integrated Grove port on this accelerometer allows for plug-n-play usage by utilizing a 4-pin Grove interface, making it easy to connect with your standard Arduino device or Seeeduino (Seeed’s version of Arduino) instead of the conventional complicated and messy jumper wires.
Product Applications include:
- Inertial measurement units (IMUs)/altitude and heading reference systems (ADHRs)
- Platform stabilization systems
- Condition monitoring
- Seismic imaging
- Tilt sensing
- Robotics
ADXL series comparison: ADXL356 vs ADXL345 vs ADXL335
The main differences are covered in the table below, we’ll look into further details later on
| ADXL356 | ADXL345 | ADXL335 | |
|---|---|---|---|
| Range | ±10g to ±40g | ±16g | ±3g, small range with precise readings |
| Interface | Analog | SPI, I²C | Analog |
| Power Consumption | Low Typical: 150µ |
Low Typical: 140µ |
Standard Typical: 350µ |
| Pricing | High | Low | Lowest |
| Bonus Features | Covered in the earlier section | Some inbuilt functions | No Bonus Features |
ADXL356: Spec King
We can conclude that ADXL356 is the spec king, with better specs across the board due to its belonging to the higher end of the accelerometer spectrum. Hence, we’ll not dive further into its direct comparison with the other two models as it wouldn’t be the fairest.
ADXL335 vs ADXL345
The ADXL335 is a triple axis MEMS accelerometer with a low power consumption of 150 μA in the measurement mode! This analog accelerometer is a low g accelerometer with a minimum full-scale range of ±3 g. Grove ADXL335 can measure the acceleration with a minimum full-scale range of ±3 g. It can measure the static acceleration of gravity in tilt-sensing applications, as well as dynamic acceleration resulting from motion, shock, or vibration. With the onboard Grove connector, you can easily plug and play it with your Arduino board.
The ADXL345 is well suited for mobile device applications. It measures the static acceleration of gravity in tilt-sensing applications, as well as dynamic acceleration resulting from motion or shock. Its high resolution (3.9 mg/LSB) enables measurement of inclination changes less than 1.0°. Grove – ADXL345 is with the extreme low power consumption, as low as 23 μA in measurement mode and 0.1 μA in standby mode. The Low power modes enable intelligent motion-based power management with threshold sensing and active acceleration measurement at extremely low power dissipation. There is an onboard a 4-pin Grove interface (3-5VDC) for easily connect with Arduino boards and Seeeduino boards.
Applications:
The ADXL345 is more suited for mobile applications, opening for more potential projects due to its digital interface
Ease of Usage:
The ADXL335 would be easier to use due to its analog interface instead of SPI/I2C.
Overall comparison:
Overall, the ADXL335 is an older version of the accelerometer, losing out on the following advantages that ADXL345 possess:
- Wider range
- Better sensitivity
- Bonus features such as:
- Inactivity detection
- Freefall detection activity
- Angle measurement of less than 1°
- Lower power consumption
These advantages fancy the ADXL345, making it a better cost-effective option but one thing to keep in mind of its ease of usage; complicated to use due to its SPI/I2C communication protocol.
Recommended Accelerometers
Despite the comparative advantages and more, you should discover the purpose of your project and select the most suitable one. I would recommend each accelerometer as follows:
- Most cost-effective option: ADXL345
- Beginners’/first-time user option: ADXL335
- Best performance and widest usage applications: ADXL356
*Note: All accelerometers are Arduino compatible
If you do not have a preference for one, here’s my personal recommendation:
ADXL356, as despite its higher price tag, consider it as a long-term investment. Its ease of usage, widest possible applications allows for beginners to easily get started and advanced users to find it useful.
Getting started with the ADXL356
If you’re having thoughts on picking up the ADXL356, this section is for you. I’ll be walking you through on the pairing guide
What you’ll need:
*Seeeduino is Seeed version of the Arduino Board
Hardware connection
- Step 1: Connect the Grove- 3-Axis Analog Accelerometer ±40g (ADXL356C) to the A0 port of the base shield
- Step 2: Plug Grove – Base Shield into Seeeduino
- Step 3: Connect Seeeduino to PC via a USB cable
Software configurations
If this is the first time you are working with Arduino, I recommend you to see Getting Started with Arduino before moving on
- Step 1: Download the Seeed_ADXL_356.ino from Github or copy the following code:
#include <Arduino.h>

#ifdef ARDUINO_SAMD_VARIANT_COMPLIANCE
  #define SERIAL SerialUSB
  #define SYS_VOL   3.3
#else
  #define SERIAL Serial
  #define SYS_VOL   5
#endif

float cali_data_xy;
float cali_data_z;
int16_t scale;

#define MODUEL_RANGE           40

#define MODULE_VOL             1.8

#define CALI_BUF_LEN           15
#define CALI_INTERVAL_TIME     250

float cali_buf_xy[CALI_BUF_LEN];
float cali_buf_z[CALI_BUF_LEN];

#define XY_PIN   A0
#define Z_PIN    A1

float deal_cali_buf(float *buf)
{
    float cali_val = 0;

    for(int i = 0;i < CALI_BUF_LEN;i++)
    {
        cali_val += buf[i];
    }
    cali_val = cali_val/CALI_BUF_LEN;
    return (float)cali_val;
}


void calibration(void)
{
    SERIAL.println("Please Place the module horizontally!");
    delay(1000);
    SERIAL.println("Start calibration........");

    for(int i=0;i<CALI_BUF_LEN;i++)
    {
        cali_buf_xy[i] = analogRead(XY_PIN);;
        cali_buf_z[i] = analogRead(Z_PIN);
        delay(CALI_INTERVAL_TIME);
    }
    cali_data_xy =  deal_cali_buf(cali_buf_xy);
    cali_data_z =  (float)deal_cali_buf(cali_buf_z);
    SERIAL.println("Calibration OK!!");
    scale = (float)1000 / (cali_data_z - cali_data_xy);
    cali_data_z -= (float)980 / scale;
    SERIAL.println(cali_data_xy);
    SERIAL.println(cali_data_z);
    SERIAL.println(scale);

}


void AccMeasurement(void)
{
    int16_t val_xy = 0;
    int16_t val_z = 0;
    val_xy = analogRead(XY_PIN);
    val_z = analogRead(Z_PIN);

    SERIAL.print("Raw data xy  = ");
    SERIAL.println(val_xy);
    SERIAL.print("Raw data z  = ");
    SERIAL.println(val_z);
    SERIAL.println(" ");

    val_xy -= cali_data_xy;
    val_z -= cali_data_z;
    SERIAL.print("x or y position acc is ");
    SERIAL.print(val_xy * scale / 1000.0);
    SERIAL.println(" g ");
    SERIAL.print("z position acc is ");
    SERIAL.print(val_z * scale / 1000.0);
    SERIAL.println(" g ");
    SERIAL.println(" ");
    SERIAL.println(" ");
    SERIAL.println(" ");
    delay(1000);
}

void setup()
{
    SERIAL.begin(115200);
    #ifdef ARDUINO_SAMD_VARIANT_COMPLIANCE
    analogReadResolution(12);
    #endif
    calibration();
    SERIAL.print("Scale = ");
    SERIAL.println(scale);

}


void loop()
{
    AccMeasurement();
}- Step 2: Upload the demo. If you’re unsure on how to upload the code, please check How to upload code
- Step 3: Open the Serial Monitor of Arduino IDE by click Tool-> Serial Monitor. Or tap the Ctrl+Shift+M key at the same time. Set the baud rate to 115200
- Step 4: Calibration. Follow the calibration tips in the Serial Monitor. It’ll finish in a few steps.
- Step 5: Sensor can now be used, the output will appear like this
Please Place the module horizontally!
Start calibration........
Calibration OK!!
184.93
185.03
121
Scale = 121
Raw data xy  = 185
Raw data z  = 193

x or y position acc is 0.00 g
z position acc is 0.85 g


Raw data xy  = 188
Raw data z  = 196

x or y position acc is 0.36 g
z position acc is 1.21 g
Summary
Overall, with accelerometers being commonly seen in many day to day applications, consider picking up one today!
- For more information on the Grove-3-Axis Analog Accelerometer ±40g (ADXL356C), you can head here
Once again, if you’re looking to find out more about accelerometers and its buying guide, you can check out my other blog post!