Arduino Leonardo Guide – Overview, and Uno Comparison

Released years ago, the Arduino Leonardo is an ATmega32U4 microcontroller board that was somehow disregarded by most people. Iterations and older boards like the Arduino Uno caught more attention instead.
Despite being under the radar to most people, the Arduino Leonardo still packs significant performance advantages over the Uno which begs the question why isn’t it as popular? The answer to this will be revealed in a detailed comparison later in this blog.
Apart from its comparison, this blog will take a look at:
- Understanding the Arduino Leonardo: Overview, Features, and Parametrics
- Comparing it with the Arduino Uno
- Developing on the Arduino Leonardo
- Software Development
- Hardware Development
An overview of the Arduino Leonardo
Release date: July 23, 2012
Microcontroller: ATmega32u4 with built-in USB communication, eliminating the need for a secondary processor
Full Parametrics:
| Specifications | |
|---|---|
| Microcontroller | ATmega32u4 |
| Operating Voltage | 5V |
| Recommended Input Voltage | 7-12V |
| Input Voltage (limits) | 6-20V |
| Digital I/O Pins | 20 |
| PWM Channels | 7 |
| Analog Input Channels | 12 |
| DC Current per I/O Pin | 40 mA |
| DC Current for 3.3V Pin | 50mA |
| Flash Memory | 32 KB, 4 KB used by bootloader |
| SRAM | 2.5 KB |
| EEPROM | 1 KB |
| Clock Speed | 16 MHz |
| Dimensions (L x W) | 68.6mm x 53.3mm |
| Weight | 20g |
Other features include: Power jack, ISCP header, and a reset button
What makes it unique?
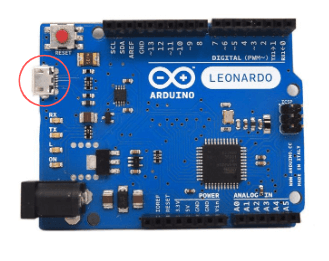
First to include built-in USB
The inbuilt USB 2.0 communication is what makes it different from other Arduino boards. With this, the Leonardo is able to directly communicate with your PC via just USB, allowing for it to behave like a mouse or a keyboard. Through the support of the Arduino Keyboard Library, it opens up the possibility for far more interesting applications.
Arduino Leonardo vs Arduino Uno: The comparison
Let’s take a look at the differences in specs:
| Arduino Leonardo | Arduino Uno | |
|---|---|---|
| Microcontroller | ATmega32u4 | ATmega328 |
| Digital I/O Pins | 20 | 14 |
| Analog Input Pins | 12 | 6 |
| PWM Channels | 7 | 6 |
| Flash Memory | 32 KB of which 4 KB used by bootloader | 32 KB of which 0.5 KB used by bootloader |
| SRAM | 2.5 KB | 2 KB |
Analog Pins
- Arduino Leonardo has more analog pins, where A0-A5 are dedicated for analog, and A6-A11 are on digital pins
Input and Output Pins
- Arduino Leonardo is capable of using 20 pins as compared to Uno 14 as it can use the analog pins to be I/O
Extra PWN Pin
Extra SRAM for faster access to data
Arduino Leonardo vs Arduino Uno Here’s why the UNO is more popular:
Earlier release and benchmark for development boards
Released 2 years before the Arduino Leonardo, the Uno became the industry standard for development boards with its unique pin header arrangement that makes it compatible with most shields on the market.
Its ease of usage and above specifications made it stood out and quickly rose to the top as others made iterations of it.
Stuck? It’s easier to find tutorials online
With its popularity, comes a bigger community with bigger support. Uno tutorials are easily available on the web, where most of them aren’t compatible with Leonardo.
Arduino Leonardo lack of compatibility with Uno Shields
Arduino Uno was known for its compatibility with many shields, where shields are developed to fit nicely on the board. However, it isn’t the case for the Arduino Leonardo.
If you own many old Arduino shields, there may be problems working it with the Arduino Leonardo. Not all UNO compatible shields work w the Leo, which is commonly voiced out in the Arduino Community.
Why Leonardo is still a good pickup you should consider:
In theory, those above may be the underlying reason why UNO is a much more popular pickup.
However, we’re here today to talk about the Arduino Leonardo and here’s why you should still pick up the Leonardo instead:
- Better performance
- Much more support on the USB
- No external USB interface chip
- Much more flexible in implementing protocols other than Serial UART
Did I mention the price?
For all these advantages, you’re getting it at a cheaper price than what the Uno cost!
Developing on the Arduino Leonardo:
Software Development:

Software developing on the Arduino Leonardo can be done by programming it through the Arduino IDE. Under the Tools > Board menu, select Arduino Leonardo.
The ATmega32u4 microcontroller allows you to upload new code to it without an external hardware programmer as it comes with a bootloader.
For more information; you can refer to references and tutorials
Hardware Development:
Developing made easier: Hardware Development Kit for Arduino Leonardo

To help ease your hardware developing experience/get started designing an Arduino project on Leonardo, this hardware development kit is for you.
What is this kit all about?
Shortening your design process by including guidelines that provide drawings of common circuits like power, oscillator, reset, etc.
Not needing to purchase many small components as it provides commonly used components like Atmel 32u4, 16M crystal, resistor, switch, and many more!
Other features include:
- Available for individual purchase
- Includes DIP ATmega32u4 with Arduino Uno Bootloader
- PC Pinout configuration diagram
Full Part List:
- Commonly-used circuits instructions
- IC Pin configuration diagram ×2
- $10 Fusion coupon ×1
- Protoboards ×2
- ATMEGA32U4-MUR ×2
- Crystal 16MHz ×3
- USB connector ×3
- JST 2.0 connector ×2
- DIP DC Power Jack ×2
- Ethernet RJ45 connector ×2
- Colourful LED ×22
- PMIC Vin 30V Vout 3.3V ×3
- PMIC Vin 25V Vout 5V ×3
- DIP Resistor 1K ×20
- DIP Resistor 10K ×10
- DIP CAP Ceramic 22pF ×6
- DIP CAP Ceramic 100nF ×10
- DIP CAP Aluminum 47uF-16V ×6
- Male header(3p/20p/40p) ×11
- Female header ×10
- IC Socket ×3
- Button ×5
- Jumper Wire ×25
- Rivet ×10
Summary
Overall, be it a beginner or experienced developer, the Arduino Leonardo is a good place to start. Getting started on the board isn’t a difficult task since it’s relatively similar to other Arduino boards through Arduino IDE.
There are plenty of project ideas you can explore; be it using the Leonardo as a mouse, pairing up with sensors for measurement, etc. To help you smoothen the selection/development process, try this hardware development kit out