Best Guide for Building A Robot Car
Have you ever wanted to build your own robot car and see the robot car moving around? In this guide, we will step by step to show you how to DIY your robot car and choose the accessories to bring more features. Even if you have never tried such a project before, you can use this guide to improve your hands-on skills and familiarize yourself with some basic code.
-2.gif)

Building your Chassis
Step 1: Material preparation
You will need the following materials to assemble your car. If you are not sure how to choose the model number of the component, please read these instructions to learn how to assemble them together.
- Two motors
In terms of motor selection, you can choose the JGA-25 series of motors. The JGA-25 series motors have encoder versions, which can measure the speed of the car. At the same time, you can also choose TT motor. Its performance is slightly weaker than the JGA-25 series motor, but it also more affordable.
- Two wheels
Depending on the motor we pick, we would have to choose its corresponding wheel. If you are using the TT motor, you would have to choose the TT DC MOTOR WHEEL. This product is not only of good quality but also of an affordable price, making it a very good choice. Another wheel, the 6514A freewheel, can be matched to the TT motor and the N20 motor by replacing the Couplings Kit accessory. Our store offers better products, such as the 97mm Mecanum Wheel (4 packs), which features two revolvers, two right wheels, one hex tool, and four couplings that perfectly match the JGA- 25. These would make your car cooler and more interesting.
- MCU control board
We can choose the traditional microcontroller development board as the control core of the car, such as Arduino, Seeeduino,etc.
You can also choose some of the most popular AI development boards, such as Raspberry Pi 4 and Nvidia Jetson Nano
These motherboards would equip your car with AI capabilities.
- Motor driver board and Grove sensor
- Mini car base boards
Choose the different types of base boards according to the MCU control panel you chose. We offer Raspberry Pi Acrylic base boards (coming soon), Jetson nano Acrylic base boards (coming soon), and Seeeduino Acrylic base boards(coming soon).
- Battery holder and 4x 1.5-volt batteries (coming soon)
- Others
The JGA25-371 Motor Bracket (https://www.seeedstudio.com/JGA25-371-Motor-Bracket-p-4118.html) can help you secure the motor during the assembly process.
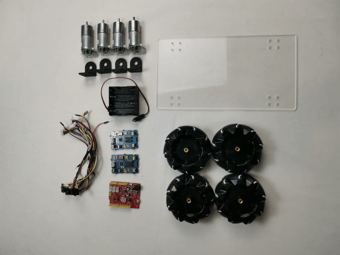
In this guide, I selected a customized acrylic base board, four jga-25 Motor and matching jga25-371 Motor Bracket, 97mm Mecanum Wheel (4 packs), Seeduino development board, and two Grove I2C Motor Driver Driver boards as examples to show how to assemble a small car easily.
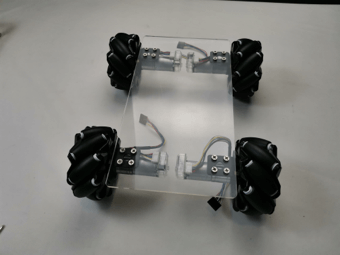
Step 2: Mount the wheel and motor on the body
Screw each wheel onto the corresponding motor and secure the motor to the acrylic base board in this manner:
- Fix the motor to both sides of the base board. It is necessary to pay attention to the bilateral symmetry.
- After fixing on the base board, try rolling the wheels to ensure that the wheels can move normally.
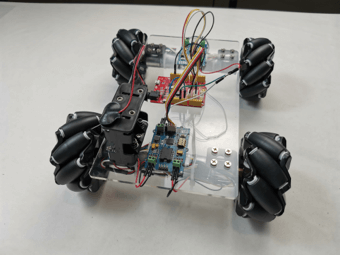
Step3: Secure development board and motor drive board
- Secure the development board and motor drive board and battery case to the base board.
- During the fixing process, it should be noted that the installation position cannot affect the movement of the trolley.
Wiring
Step 1 Connect the battery case
The battery case has two connecting wires, one end is positive (red) and one end is negative (black). The connection is as follows:
- Connect the positive line to the Vin pin of the development board.
- Connect the negative wire to the Gnd pin of the development board.
Step 2: Connect the motor drive circuit:
- Connect the positive pin of the motor drive to the Vin pin of the development board.
- Connect the negative wire on the motor drive to the Gnd pin of the development board.
- If you have difficulty identifying the pins, please consult the online guide for the specific model.
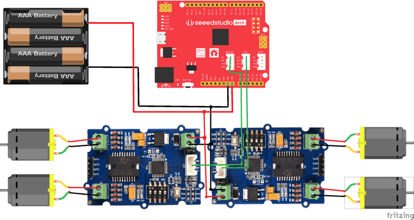
Step 3: Connect the motor to the motor drive board:
- Connect the positive and negative poles of the motor drive board to the two positive and negative poles of the two motors.
Programming the Robot Car
Connect the computer and program
Connect the development board to the computer and open the corresponding Arduino IDE. You can program the motion of the car through the Arduino IDE. So, as shown below, I will simply demonstrate the straight and rotation of the car.
Try more and extend functionality!
You can enrich the functionality of the car by adding various sensors and various modules.
Recommendation 1: Bluetooth car
Add Grove – Serial Blueseeed TH to the car to receive data and download the Bluetooth Serial Assistant app on your mobile phone to control the car with your phone.
Recommendation 2: Radar mini car
This would be a rather challenging one. You can use NVIDIA Jetson Nano as the control core of the car and add a radar module for autonomous positioning navigation. Further, you can let the Raspberry Pi Camera be the eyes of the car which can have the function of image recognition.
More unexpected ideas are waiting to be fulfilled by you. If you assemble your car, you are welcome to share it on our forum.
Shopping Guide: where to get all the parts for my robot car?
Please check our Robot Car Guide at our online store to get all parts together! And we are also offering global free shipping for RPLIDAR A1M8 and RPLIDAR A3M1 to maker your robot car much more powerful.

